REST Reference Tutorial
The REST reference tutorial shows you how to create a simple REST Invoke to an existing REST Service defined by a Swagger specification.
You cannot convert REST reference to SOAP or vice versa.
Before you begin The REST service which you want to invoke must be accessible from the reference process at the time of its invocation.
Creating a New Application
- Open TIBCO Business Studio for BusinessWorks.
- Open the Design perspective by clicking the Design icon in the upper right corner.
- Click and click Next.
- Enter tibco_bw_sample_binding_rest in the Project Name text box. Do not change the remaining default settings.
- Click Finish. This step creates a new application module with an empty process.
Obtaining the REST Service Swagger File
Note: The REST service for which you want to obtain the Swagger file must be running.
To obtain a Swagger file for a REST service, do the following:
- On the Apps page of TIBCO Cloud Integration , click the service whose Swagger file you want to consume to create a REST reference.
- Click the Download link icon next to the API name. It downloads the JSON file for the service to your local machine.
- Open the location of the downloaded file in File Explorer view.
- Import the downloaded JSON file by dragging it from the File Explorer view and dropping it into the Service Descriptors folder of your project.
An alternate way to import the Swagger file is from the Cloud Applications view in TIBCO Business Studio for BusinessWorks. Expand the application under Apps, and drag the endpoint into the Service Descriptors folder of your project. The Swagger file imported from the Cloud Applications view is a concrete WSDL/JSON file.
Importing the JSON File into your Project
- In the Project Explorer, expand tibco_bw_sample_binding_rest application module.
- Right-click Service Descriptors and select and click Next.
- In the File system dialog box, click the Browse button and browse to the location of the Books.json file.
- Select the check box next to Books.json in the left pane and click Finish.
Creating the REST Reference
- In the Project Explorer, completely expand the tibco_bw_sample_binding_rest folder under Service Descriptors.
- Select the /books under Books.json and drag and drop it to the right side of the process in the Process Editor. The references are added to the process. The purple chevron indicates the service and its operations.
- In the Process Editor, right-click . Optionally, you can configure the Sleep activity with IntervalInMillisec as 3000 in a similar manner and connect the Timer with Sleep.
- Drag the get operation under the purple chevron and drop it on the right of Timer activity (or Sleep if configured) and connect the Timer activity with the get activity.
- Drag the post operation under the purple chevron and drop it on the right of the get activity, connect the get activity with the post activity.
- Right-click the get activity select Show Properties View.
- In the Properties view, select the Input tab and click Show Check and Repair icon in the icon bar on the upper right corner of the Properties view.
- Select the check box under Fix and click OK.
- Click Show Check and Repair icon again.
- Select the check box under Fix and click OK.
- Select the post activity and right-click and select Show Properties View. In the Properties View, select the Input tab and select Data Source tab.
- Expand in the Data Source tab completely.
- In the XPath Expression pane, expand the post-input completely.
- Drag and drop Book* from the Data Source tab to the Book* under post-input in the XPath Expression pane.
- In the Drop dialog, select Make a copy of each "book" radio button and click Finish.
- Click Show Check and Repair icon in the icon bar on the upper right corner of the Properties view.
- Select the check box under Fix and click OK.
- Click Show Check and Repair icon again. Select the check box under Fix and click OK.
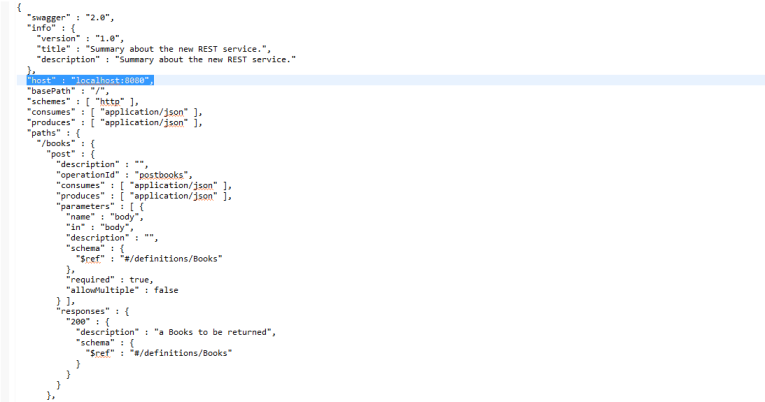
- In the
Project Explorer, select
Books.json under
Service Descriptors of
tibco_bw_sample_binding_rest_basic application module, and right-click
and locate the "host" attribute. Make a note of the host name and port number.
- Expand the Resources folder under the tibco_bw_sample_binding_rest_basic application module.
- Double-click HttpClientResource.httpClientResource.
- In the HTTP Client section, change the Default Host to
BW.HOST.NAMEand Default Port to443and select the Default Confidentiality check box. This is required when accessing services running in the cloud.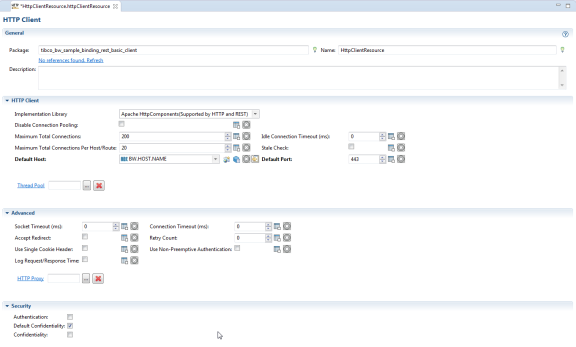
- Click .
Testing the REST Reference
You can now test the REST service using the built-in tester and the Swagger UI. To do so follow these steps:
- Click .
- In the left pane of the Debug Configuration wizard, expand BusinessWorks Application and select BWApplication.
- Click the Applications tab, then click Deselect All if you have multiple applications.
- Select the check boxes next to tibco_bw_sample_binding_rest_basic_application and tibco_bw_sample_binding_restapp.
- Click Debug. This runs the sample in debug mode. The Console view is opened and shows engine messages similar to: Started BW Application [ tibco_bw_sample_binding_rest_basic_application:1.0]
- In the Debug view, expand and select get.
- In the
JobData view, you can see the job data of the
get activity.
