Creating Mapping Files
Use Foresight Translator to create mapping files.
Note: For complete information on how to create mapping files, see
Foresight Translator documentation.
To create mapping files, perform the following steps:
- Open Translation Tool. You can do so in one of the following ways:
- On Windows, select .
- In the EDISIM Standards Editor toolbar, click the
Translator Tool
 icon.
icon.
- Select in the menu. The Open Source Guideline dialog box opens. Navigate to the directory to import the source guideline. This is the guideline that describes the input data.
- Select in the menu. The Open Target Guideline dialog box opens. Navigate to the directory to import the target guideline. This is the guideline that describes the output data.
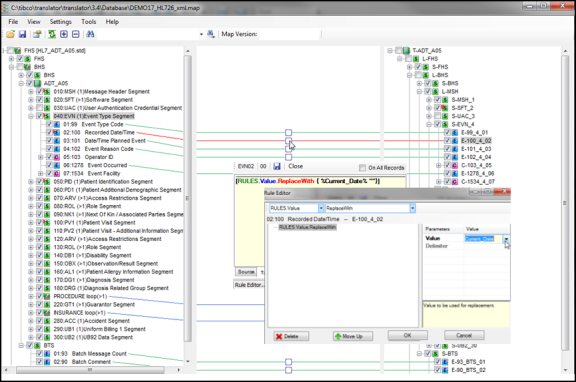
- Expand the source and target nodes to edit the map. Select the checkbox for the source data item from the left panel and then select the corresponding checkbox for the target data item from the right panel. If the mapping succeeds, there is a red or green line connecting the source and the target data.
To delete the mapping between the source data and the target data, clear the checkboxes for the source data and the corresponding target data.
- Set up transformation rules. Double-click the box as shown. The Rule Editor dialog box opens. Edit rules based on your requirements in the Rule Editor dialog box.
- Test the mapping file to verify your results. Click
Show the Properties Panel
 in the Translation Tool toolbar and then click the
Test tab at the bottom of the Translation Tool window. On the
Test tab, test the mapping.
in the Translation Tool toolbar and then click the
Test tab at the bottom of the Translation Tool window. On the
Test tab, test the mapping.
- Select in the menu to save the map in the Translator Database Directory.