Creating Your First REST API
This tutorial walks you through the steps to build a simple app with a REST service in Flogo. It shows how to create a basic app that returns the booking details of a specific customer based on a query sent to the app. In this tutorial, the query sent to the app checks whether the passenger's family name is "Jones". The app then returns the booking details.
For the sake of this tutorial, the sample data used are: A passenger whose family name is "Jones" and travels by the "Business" class. All other customers travel by "Economy" class.
Overall Structure of the App
This app contains:
- ReceiveHTTPMessage trigger: This trigger listens for an HTTP GET request containing the family name of the passenger requesting flight booking details. After it receives a request, it triggers the flow attached to the trigger.
- FlightBookings flow: This flow is attached to the ReceiveHTTPMessage trigger. This flow handles the business logic of the app. In this flow, you must configure a LogMessage activity to log a custom message when a request is received successfully. The LogMessage activity has two success branches:
- The first branch accepts requests with any family name and uses a condition to check if the family name in the request is
"Jones". It runs a Return activity to return the information of a flight booked in"Business"class for Jones. - The second branch runs when the first branch runs as false (that is, the family name is not
"Jones"). It runs a Return1 activity to return the information of a flight booked in"Economy"class if the family name is not"Jones".
- The first branch accepts requests with any family name and uses a condition to check if the family name in the request is
Procedure
The high-level steps for creating and configuring the app in this tutorial are as follows:
- Procedure
- Create a new app.
- Create a JSON schema to reuse it across your app. The JSON schema describes the format of the JSON data used in the tutorial. In this tutorial, we use a simple JSON schema for the request that the REST service receives and the response that the service sends back. You can specify the JSON schema directly or specify JSON data, which is converted to JSON schema automatically.
- Create a flow and add a REST trigger (Receive HTTP Message).
- Map trigger output to flow input. This is the bridge between the trigger and the flow where the trigger passes on the request data to the flow input.
- Map flow output to trigger reply. This is the bridge between the flow output and the response that the trigger sends back to the HTTP request it received. After the flow has finished running, the output of the flow execution is passed back to the trigger by the
Returnactivity. Hence, we map the flow output to the trigger reply. This mapping is done in the trigger configuration. - Add a LogMessage Activity to the flow and configure a message that the activity must log in to the logs for the app as soon as it receives a request.
- Add the first branch to check whether the passenger’s last name is Jones to return the information of a flight booked in
"Business"class forJones. - Add a second branch to process any other passengers and return the information of a flight booked in
"Economy"class if the family name is notJones. - Validate the app to make sure that there are no errors or warnings in any flows or activities.
- Push the app.
- Test the app in APITester.
Step 1: Create an app
To create a Flogo app:
- Procedure
- Click Apps.
- Click Create/Import. The What do you want to build? dialog opens.
- To create a Flogo app:
- Under Quickstart > All app types;Apps, click Create a Flogo app.
- In the block that displays below your selection, click Create Flogo app.
A Flogo app is created with the default name in the
New_Flogo_App_<sequential_app_number>format. Click the default app name to make it editable. Change the app name to
FlightAppand click anywhere outside the name to save the changes made to the name.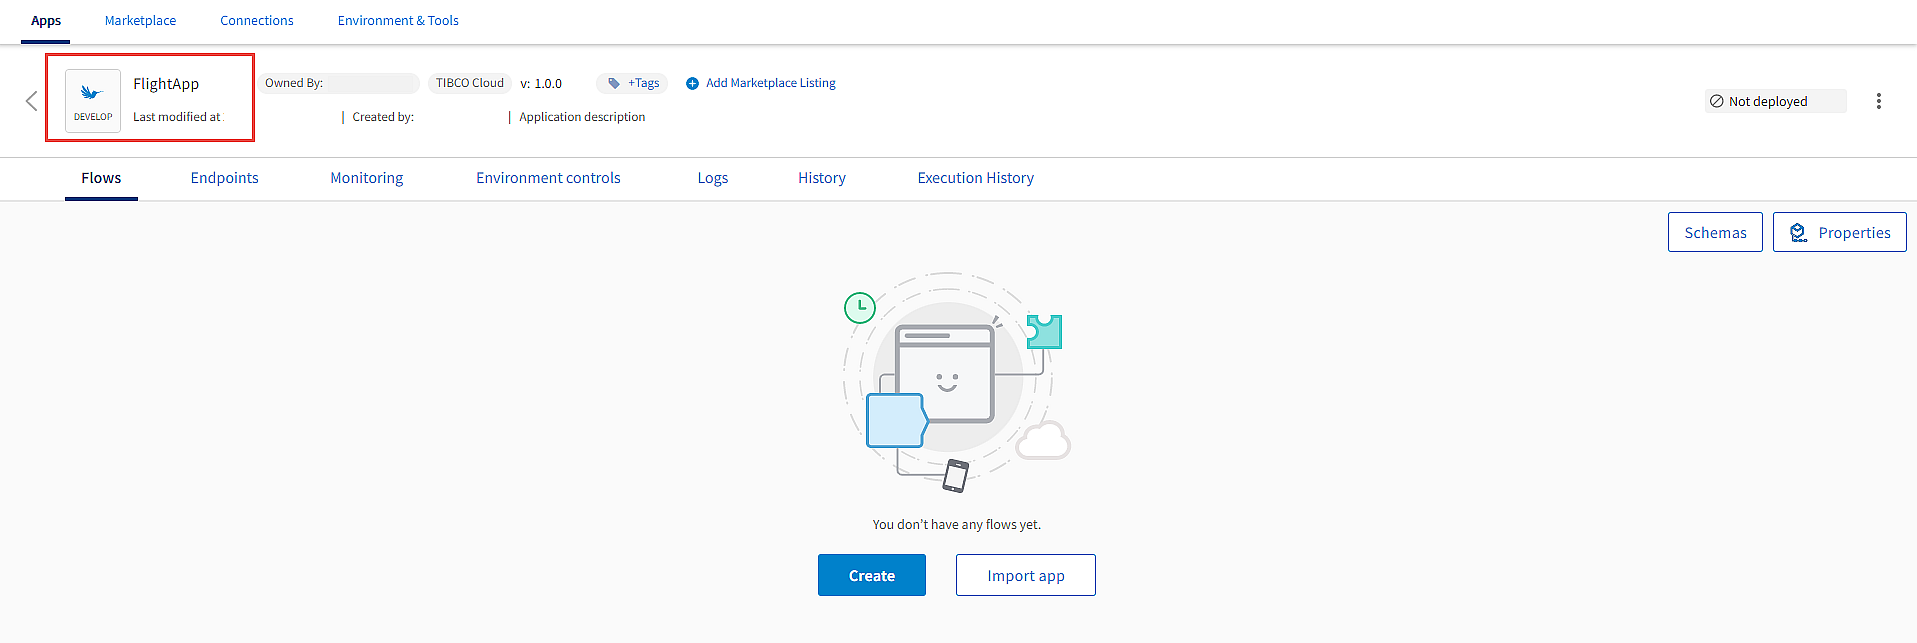
Step 2: Create a JSON schema
- Procedure
- Copy the following JSON sample to use in your app:
- On the Apps page, in the Flows section, click Schemas.
- In the Schemas dialog that opens, click Schema to add a JSON schema.
- Name your schema as
FlightResponseand paste the copied schema into the text editor. Alternatively, if you enter JSON data in the editor, the JSON data is automatically converted to JSON schema.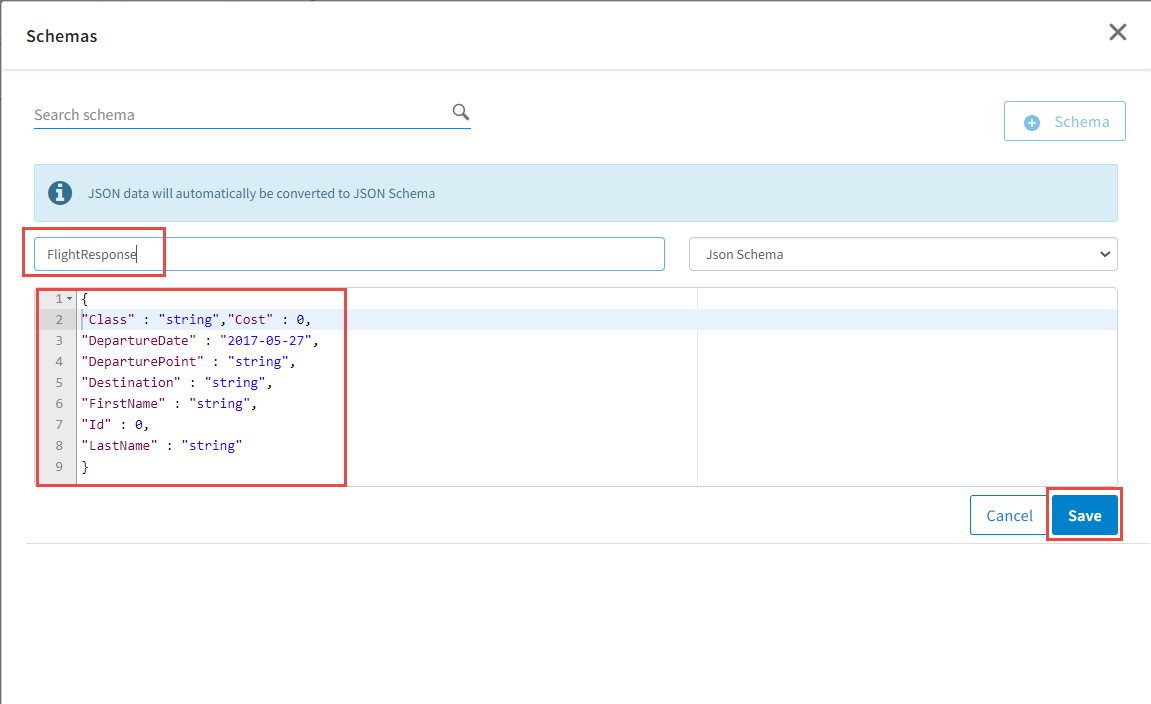
- Click Save.
{
"Class" : "string",
"Cost" : 0,
"DepartureDate" : "2017-05-27",
"DeparturePoint" : "string",
"Destination" : "string",
"FirstName" : "string",
"Id" : 0,
"LastName" : "string"
}
Step 3: Create a flow and add a REST trigger
Every app must have at least one flow and, in most cases, a trigger that initiates the flow. Create a flow with the REST trigger. The ReceiveHTTPMessage REST trigger listens for an incoming REST request that contains the details of a passenger who wants to book a flight. Specify the fields for the request in the REST trigger in JSON schema format.
To create a flow:
- Procedure
- On the Flows page, click Create.
- In the Flow details section, provide the following details and click Create:
Name:FlightBookings.
Description:Optional description of the flow.
- On the
FlightBookingsflow page, click the Triggers icon. The trigger palette opens. - From the Triggers palette, drag the Receive HTTP Message trigger to the Triggers area on the left. The
Configure trigger: ReceiveHTTPMessagedialog opens.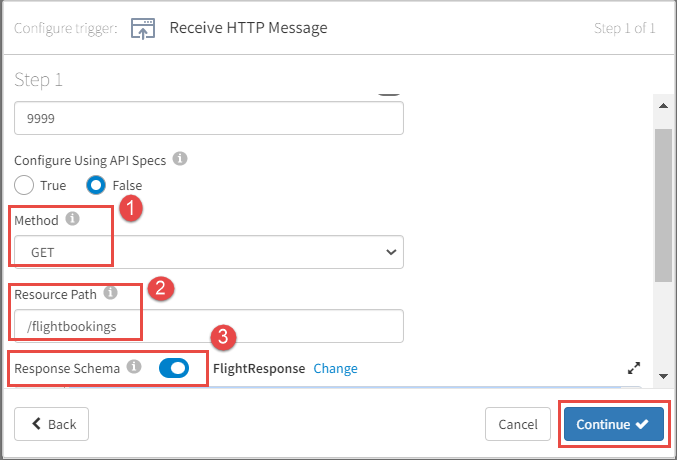
- Select GET as the Method.
- Enter
/flightbookingsin the Resource path box. - Enable the Use App Level Schema toggle next to Response Schema to open the Schemas dialog and select the FlightResponse schema you defined earlier.
- Click Continue.
The selected schema is automatically displayed in the Response Schema box.
- Next, select Copy Schema when prompted.
The schema that you entered when creating the trigger is automatically copied to the Flow Inputs & Outputs tab to match the input and output of the trigger.
A new flow is created and attached to a REST trigger.
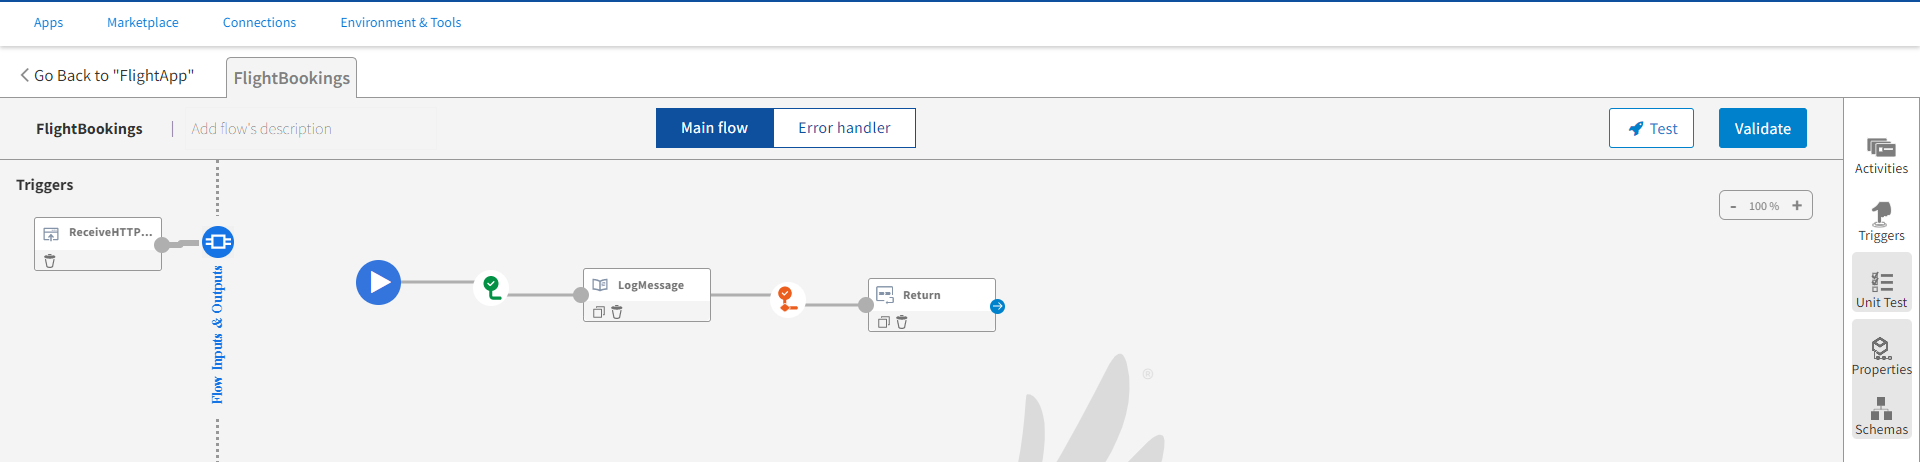
Your flow must look similar to the following image:
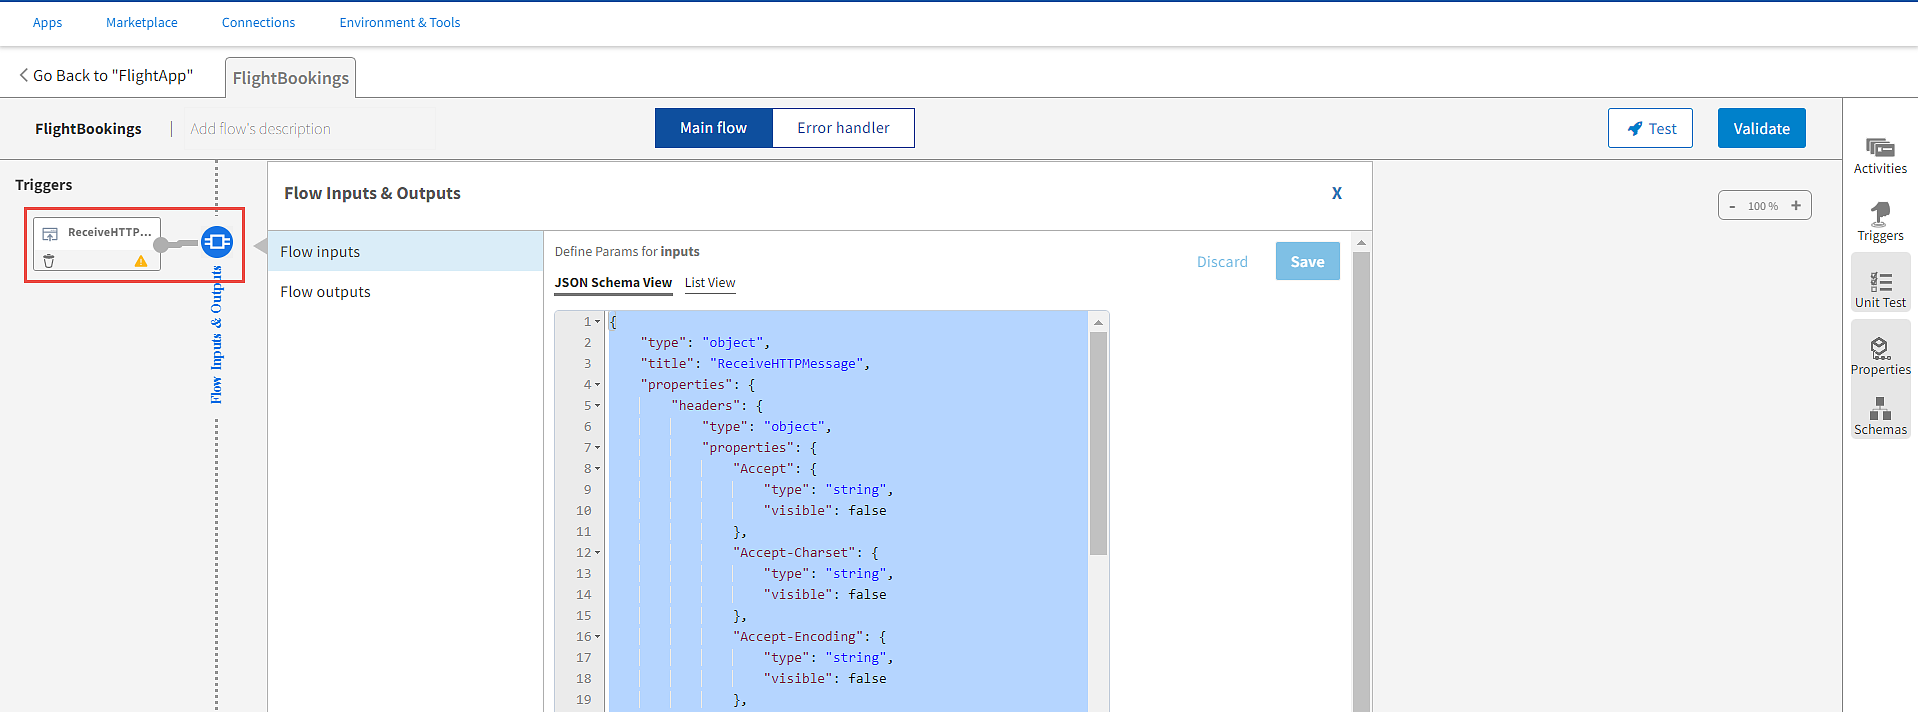
- Lastly, close the Flow Inputs & Outputs tab.
The Add triggers and flows dialog is displayed. The Flow option is selected by default.
Step 4: Map trigger output to flow input
When REST trigger receives a request from a passenger (a REST request), the data from the request is produced by the ReceiveHTTPMessage REST trigger. For the request to be processed, this output must be used by the flow in the form of flow input. Hence, you must map the trigger output to the flow input.
To do this:
- Procedure
- Click the REST Trigger icon to open its configuration dialog.
- Click Output Settings to add the query parameter.
Click Add row to add a query parameter.
In the new row in the Query Parameters table, enter the value of ParameterName as
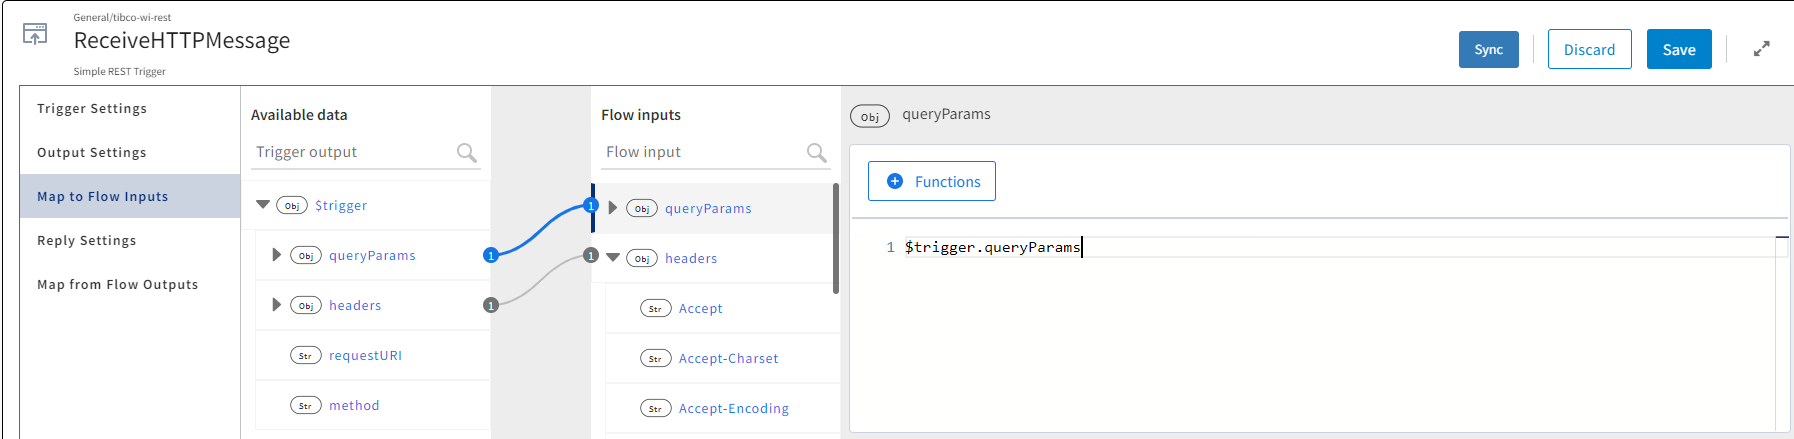
lastnameand click Save in the same row (in the Actions column).To start the mapping, click the Map to Flow Inputs tab and configure the mapping of the trigger output. On the Map to Flow Inputs tab, the Available data and Flow inputs panes are displayed. Flow inputs is the list of flow inputs that can be mapped to the trigger outputs in the Available data pane. Only headers are displayed in the flow inputs. The new query parameter is not visible yet.
- Save the trigger configuration and click Sync to display the new values. Now, queryParams must open in the Flow inputs column.
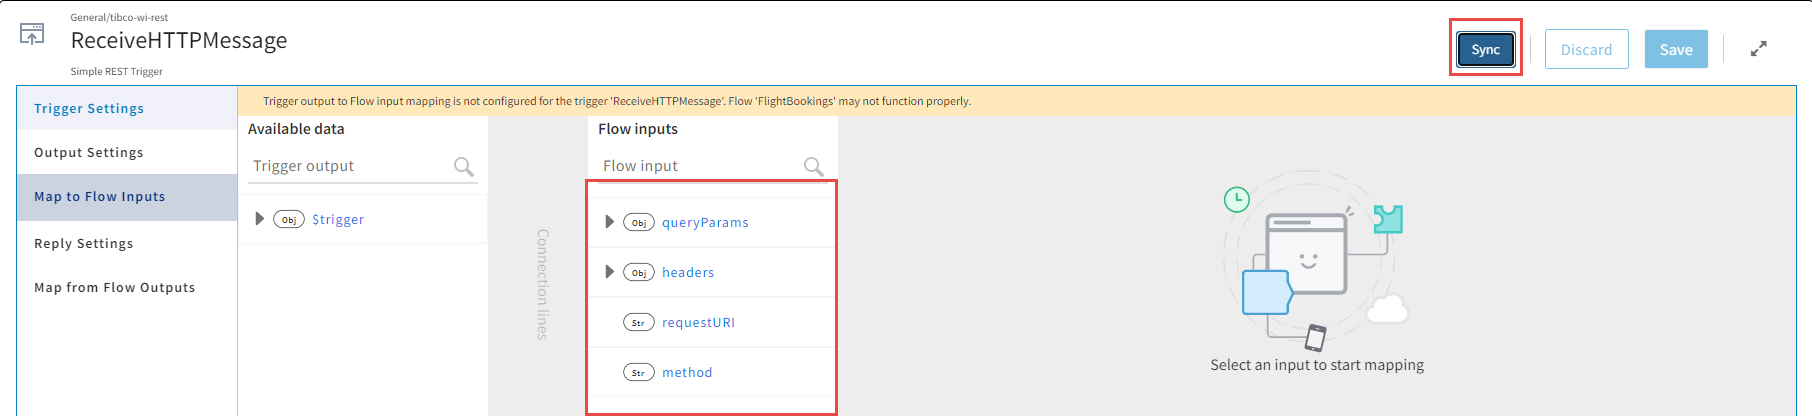
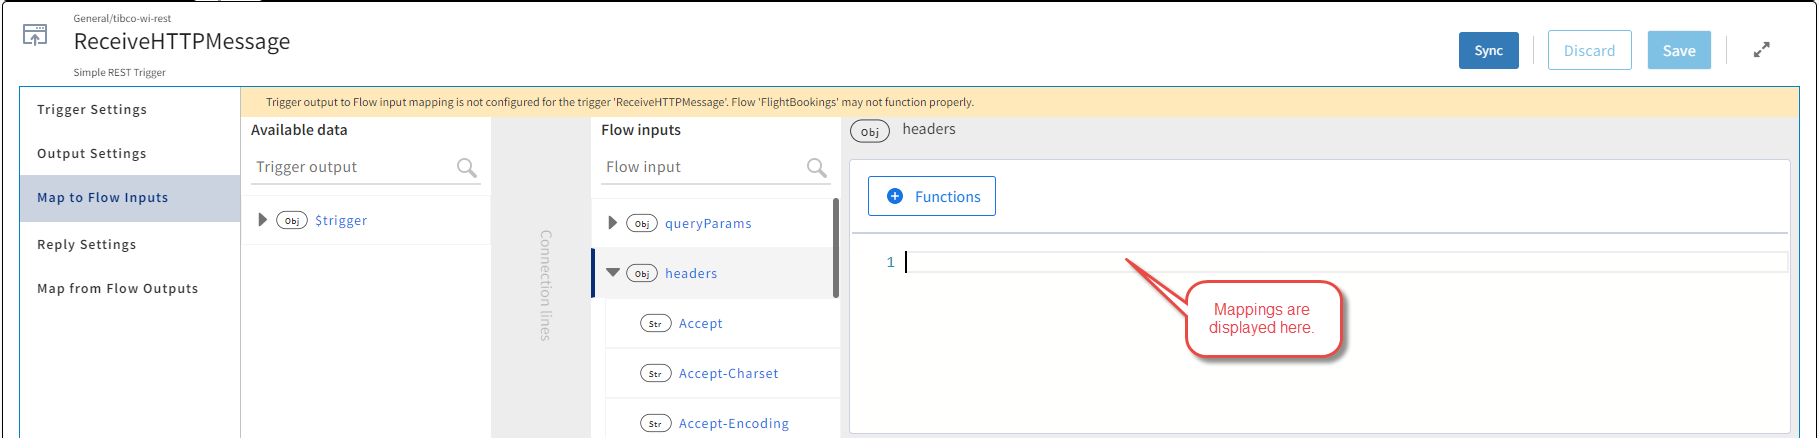
In the Flow inputs column, click headers.
The headers text editor on the right of Flow inputs is initially empty.
- To map the trigger output headers to the flow input header:
- Expand $trigger to see all the trigger outputs available. This displays the headers and body.
- Drag headers from the Available data pane to headers in the Flow inputs pane. Alternatively, click headers from the Flow inputs pane, drag headers from the Available data pane into the text editor.
The text editor must now display $trigger.headers and a connection line between the two panes. This indicates that you have successfully mapped the trigger output headers to the flow input header. The numbers at the end of the connection line indicate the total number of mappings for the selected element.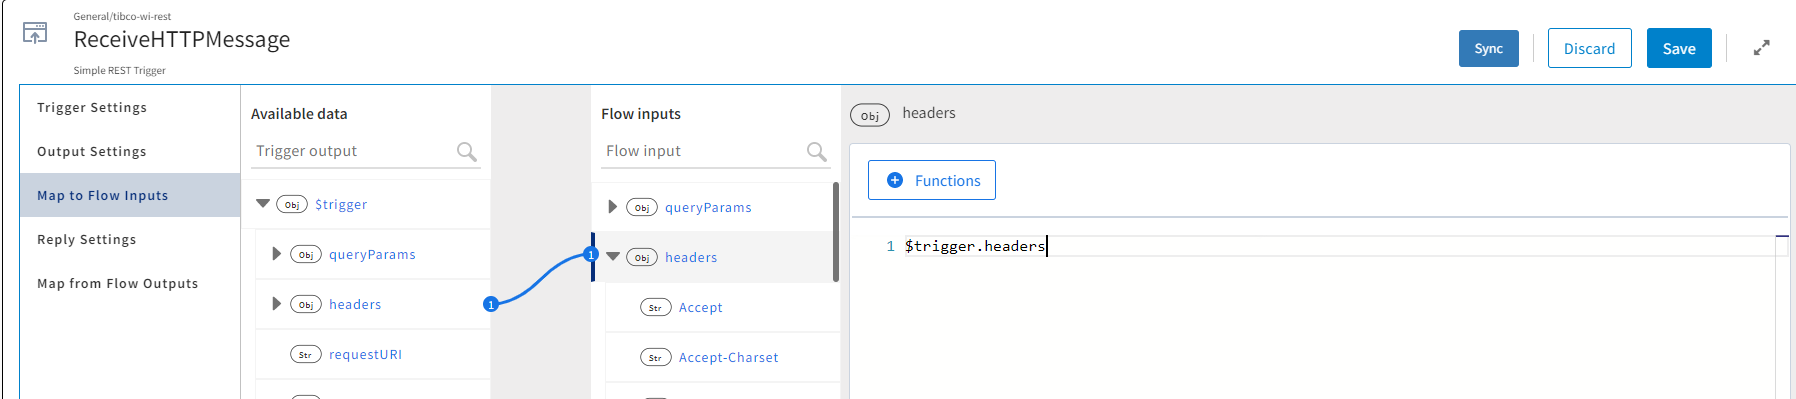
- Expand $trigger to see all the trigger outputs available. This displays the headers and body.
- To map the flow input, in the Flow inputs column, click queryParams. The data mapper view is the same as the one while mapping headers. The queryParams text editor is initially empty. Drag queryParams from the Available data pane and drop it on queryParams in the Flow inputs pane. The text editor must now display $trigger.queryParams. This indicates that you have successfully mapped the trigger output queryParams to the flow input queryParams.
To save your progress, click Save.
This completes the mapping of flow inputs.
In the Configuration dialog, multiple tabs are displayed in a column on the left. Trigger Settings is selected by default.
Step 5: Map the flow output to trigger reply
When the execution of the flow is completed, the output must be sent back to the trigger for the trigger to send a reply to the REST request initiator. Hence, the flow output data must be mapped to the trigger reply, which then returns the result of the flow execution to the REST request initiator.
To map the flow output to the trigger reply:
- Procedure
- In the left pane, click the Map from Flow Outputs tab to configure the mapping of the trigger reply. The Available data and Trigger reply panes are displayed. You can map the following trigger replies to the flow outputs - code and data.
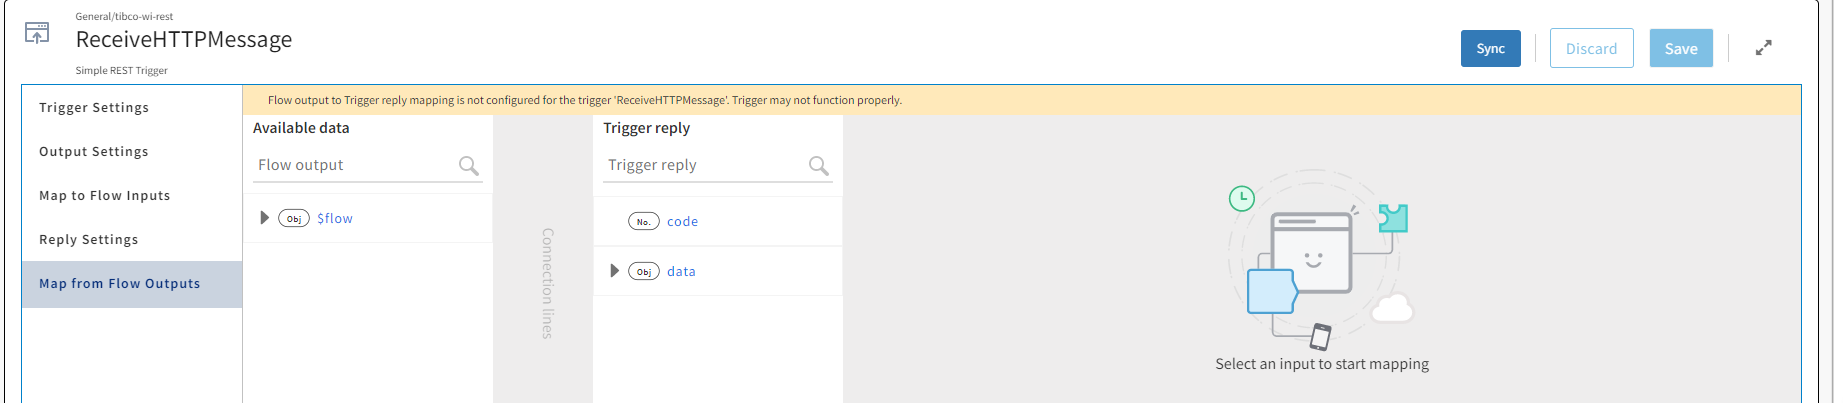
-
In the Map from Flow Outputs section:
- The Available data pane displays the data available for the mapping. $flow is displayed in this pane. To see all the flow outputs available for the mapping, expand $flow. This displays code and data.
- Drag code from Available data and drop it on code in the Trigger reply pane. $flow.code is displayed in the code text editor. You have successfully mapped the code in Trigger reply to the code in Available data.
-
Repeat the same steps to map data from Trigger reply with data from Available data.
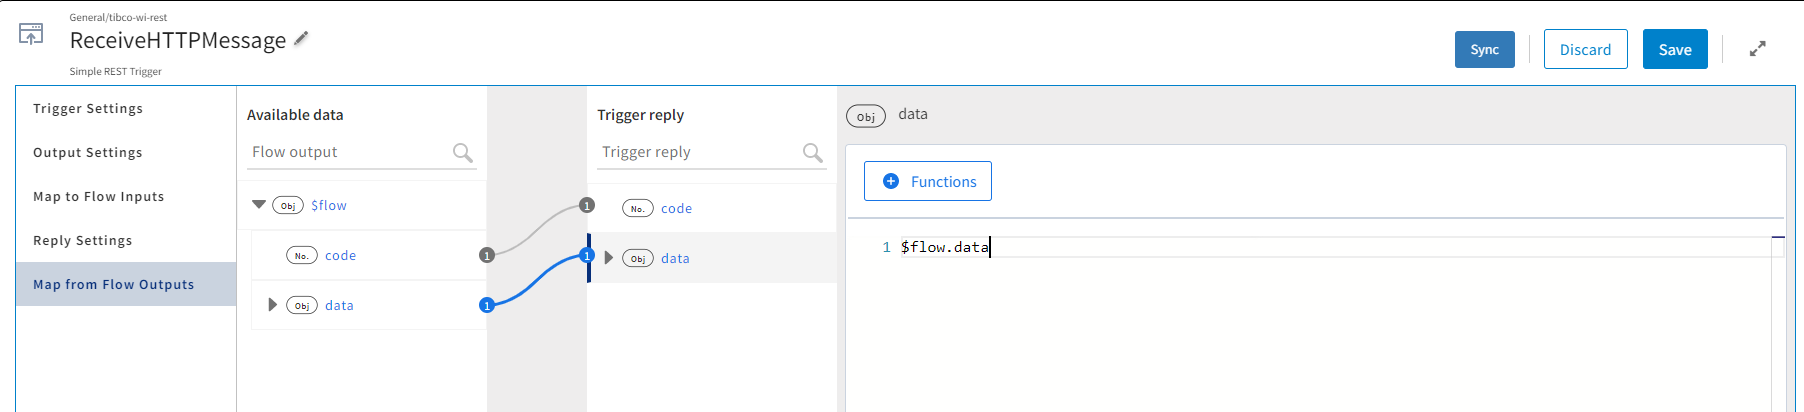
Note: You can expand data in both the Trigger reply pane and the Available data pane to see the tree structure of the data you have defined in the schema. - Click Save and close the trigger dialog.
Step 6: Add a Log Message Activity to the flow
The flow uses the LogMessage activity to log an entry in the app logs when the trigger receives a request from the passenger that reaches the trigger in the form of a REST request.
To add a LogMessage activity:
- Procedure
- On the
FlightBookingsflow page, click Activities, the activities palette opens. - In the Activities palette, under General tab, select Log Message and drag it to the activities area.
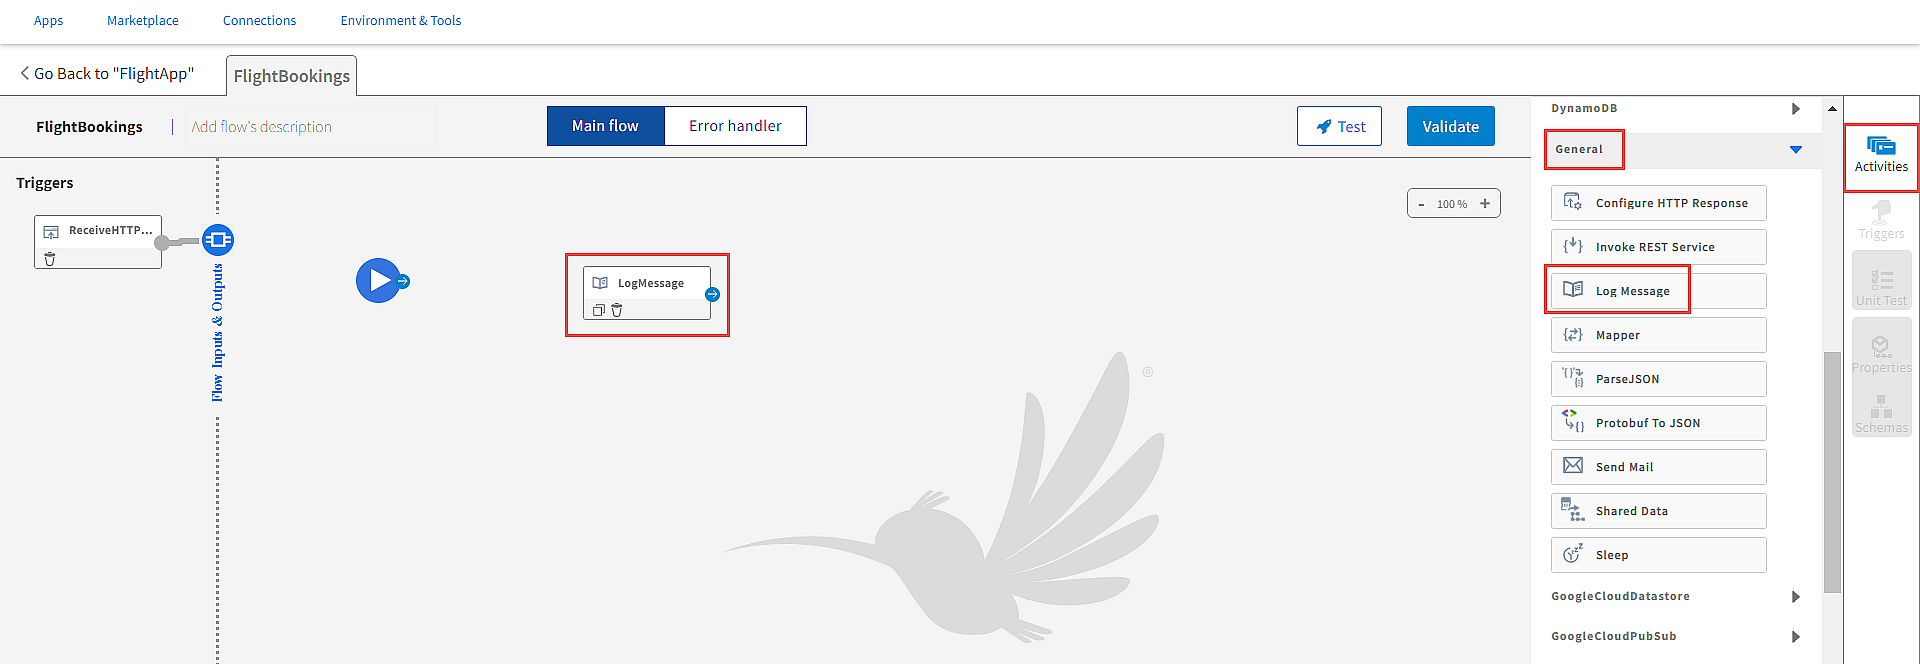
- Drag a connection line from StartActivity to the LogMessage activity that you have created.
- Now, to configure the LogMessage activity with a message to log when it receives an incoming request from the ReceiveHTTPMessage trigger:
- Click the LogMessage activity to open the configurations dialog.
- Click the Input tab. The Available data and Activity inputs columns are displayed on the right side of the LogMessage activity tabs.
- Click the message to open the mapper to the right. Configure a message to be logged by the LogMessage activity when the input from the request that the trigger received is passed on to and received by the flow.
- To configure the message, click Functions, and expand the string. Click concat(str, str2) to add the function to the message box.
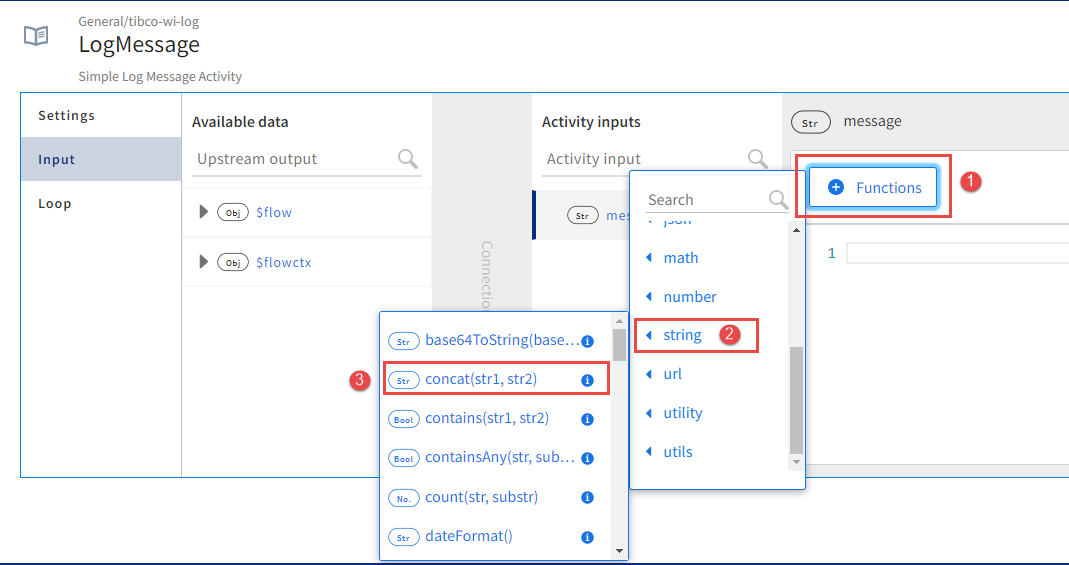
- Select str in the box and replace it by entering "Request received for: " (include the quotes too):
string.concat(Request received for: ", str2).
- Replace str2 with the family name of the passenger who booked the flight.
(The family name of the passenger is passed on from the trigger to the flow. We had mapped this trigger output to flow input previously. Hence it is now available for mapping under $flow in Available data.)- In the Available data pane, expand $flow and expand queryParams.
- Drag lastname and drop it in place of str2.
- Click Save.
- Close the
LogMessage dialog.
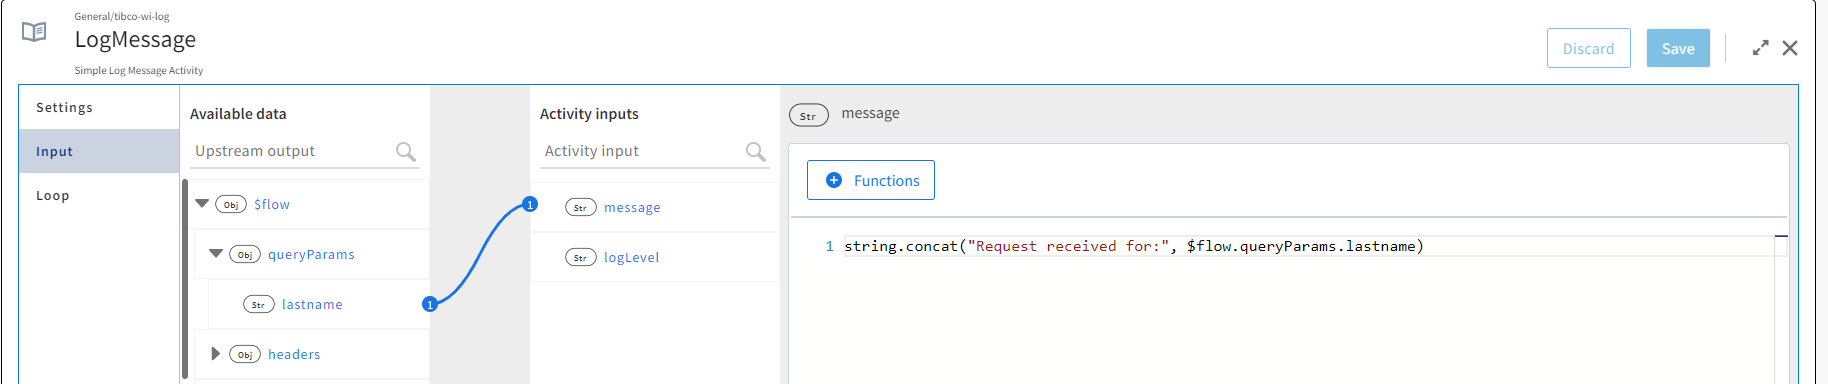
Your flow must now look like this:
Step 7: Add the first Return Activity branch
To add a Return activity and the branch to configure its condition to look for the family name "Jones":
- Procedure
- From the Activities palette, drag Return activity available under Default category to the activity area.
- Now, to configure a connection line between a LogMessage activity to the Return activity. Configure the branch with a condition to read the family name of the passenger.
- Drag a highlighted arrow from the LogMessage activity to the Return activity.
- Hover over and click the branch label on the connection line you just created. The configuration window for branch condition opens.
-
In the Branch Mapping Settings dialog that opens, select the Success with condition branch condition.
- ClickFunctions. Select the string>>contains(str1, str2). The selected function is added to the condition text editor.
- Configure str1 in the expression to take the value of the family name that the user enters. In the Available data, expand $flow > queryParams. Drag lastname to str1. This family name is the name entered by the user in the search query.
- Replace str2 in the condition by manually typing
"Jones".
- Click Save. This branch runs when the name entered as a query parameter is
Jones.
-
Now, Configure the Return activity for the branch to produce the flow results if this branch runs (when the passenger's family name is anything but
Jones):- Click the return activity to open the configuration dialog.
- Click code under Flow outputs to open the mapper and type 200 in the code box, which is the HTTP success code.

- Expand the next flow output data. All the different elements under data that are returned by this activity are displayed. Assign a value to each field under data.
- Start by clicking Class under data and type
"Business"asJonesis traveling by"Business"class. - Click Cost to type a number of your choice. You can also use a function to randomize the value. To do so, in the Functions section, expand the number category and click random(). Enter 5000 as an input parameter to the random() function.
- Click DepartureDate to enter the departure date in any format of your choice. Use quotation marks as the date needs to be specified as a string. For example, “01/01/21” or "January 1, 2021" are valid values.
- Click DeparturePoint to enter the departure airport name of your choice. Use quotation marks as the departure point needs to be specified as a string. For example, “LAX” or “LHR” are valid values.
- Click Destination to enter a string for this field. For example, "Paris" or “JFK” are valid values.
- Click FirstName to enter the first name associated with the family name
Jones. For example, "Brian" or "Paul" are valid values. - Click Id to enter a number of your choice. You can also use a function to randomize the value. To do so, in the Functions section, expand the number category and click random(). Enter 999999 as an input parameter to the random() function.
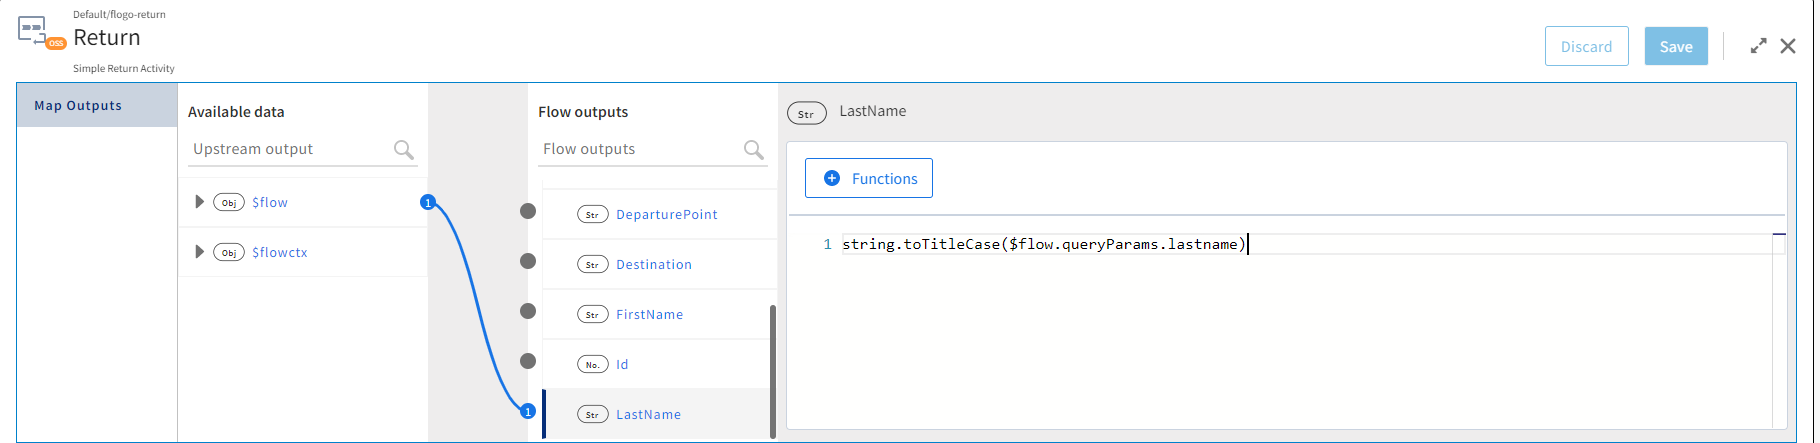
- Click LastName to map this field to the query parameter lastname. Before doing so, we can use a string function to capitalize the family name that is returned by our app. To do so, under Functions, expand the string and click toTitleCase(str). Once string.toTitleCase(str) is added to your box, select str to replace it with the query parameter. Expand $flow and then queryParams under Available data. Drag lastname and drop it in place of str. The text editor must look like this:
- Click Save and then close the
Return Activity Configurationdialog.Your flow must look like this:
Step 8: Add a second Return Activity branch
The second branch that you add from the LogMessage activity runs when the success condition of the first branch is not matched. If the passenger's family name is not "Jones", the passenger's seat is in "Economy" class.
To add a second branch from the LogMessage activity:
- Procedure
- Duplicate the Return activity from the first branch instead of manually adding another Return activity. You can copy the activity by clicking
 . The copied activity is displayed next to your original Return activity:
- Click the CopyOfReturn activity to configure the response this branch return.
- First, to create a connection between the LogMessage activity and the Return1 activity, hover over to the LogMessage activity, you see that an arrow highlighted. Drag the arrow to the Return activity.
- Select the Success with no matching condition branch condition. If the conditions of all the other Success with condition branches are not true, this branch is run. This means, if the family name entered as a query parameter is not
Jones, this second branch is run.
- Now, in the configuration window click the name of the activity to make it editable and rename the activity.

- In the Flow outputs section, expand data, select Class, and type
"Economy”as this branch must return"Economy"class bookings. -
Click Save and close the dialog.
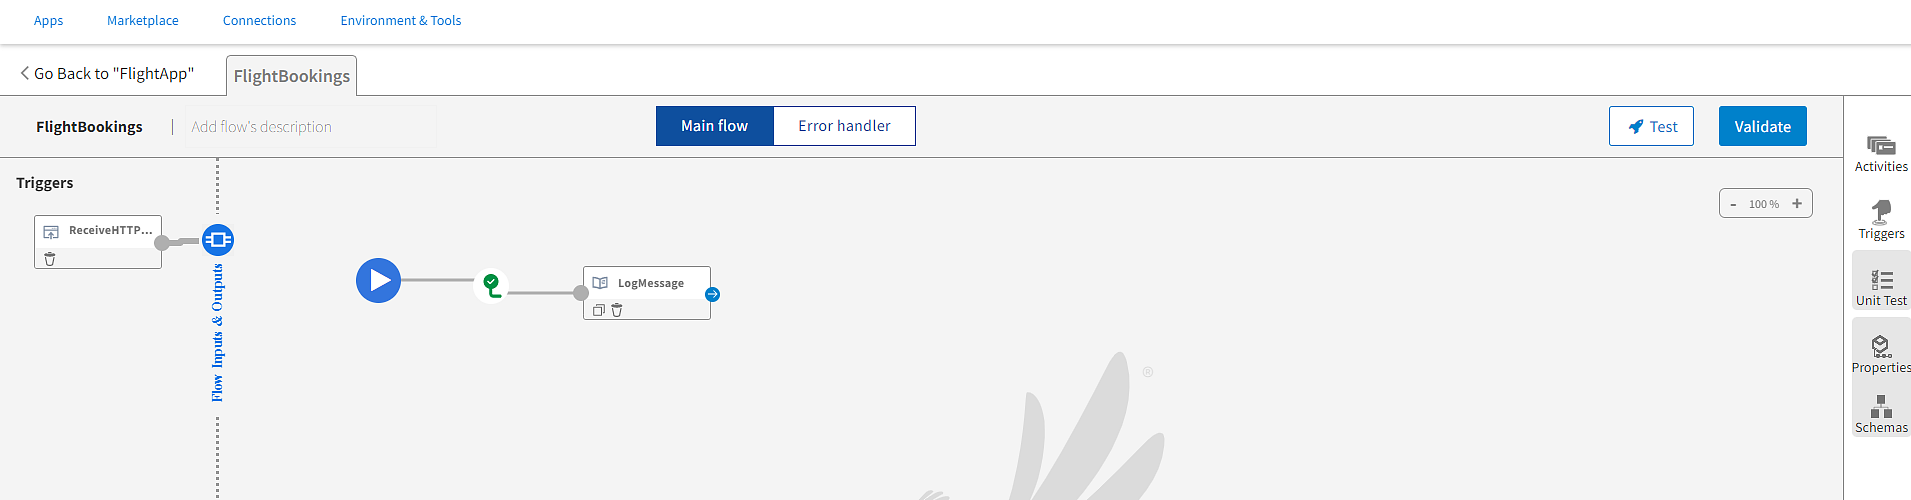
Your flow must look like this:

Step 9: Validate the app
Your app is now ready. Before you push the app to the Cloud, validate all the flows for any errors or warnings. To do so, click Validate. Flogo validates each flow and activity within the flow. For any errors or warnings, you see the respective icons next to the flow name or activity tab, which contains the error or warning.
On successful validation, you get the following message:

Step 10: Push the app
Your app is now ready to be pushed. To push your app:
- Procedure
- Click the back arrow on the top-left corner or click the Apps tab to open the app details page.
- Click
Push.
You see a message as Deploying while the app is being deployed.
- After the app has finished deploying, you see the following status:

The app is in a stopped state since there are no instances of the app running. To run the app, hover over 0 to display the up and down arrows above and below 0 . Click the up arrow above 0 such that the 0 turns to 1, and click Scale. You see the Running status once the instance starts.
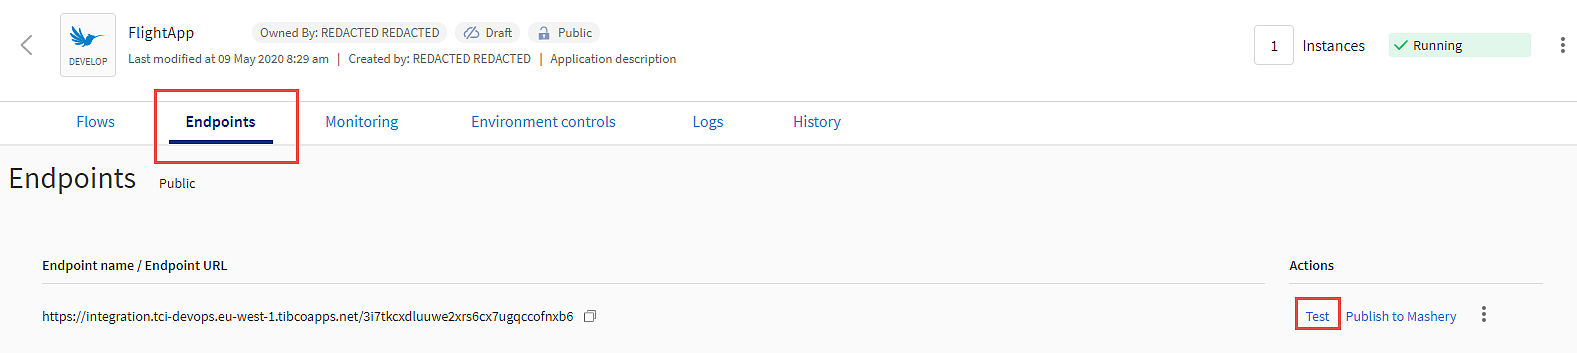
Step 11: Test the app in APITester
Now that the app has been pushed successfully, you can test the app using the APITester.
To test the app:
- Procedure
- Click
Endpoints and then click
Test.
The API for the service you just created opens in the APITester.
- Expand the GET operation by clicking anywhere on the flow name box.

- Click Try it out.
- Enter
Doefor lastname value.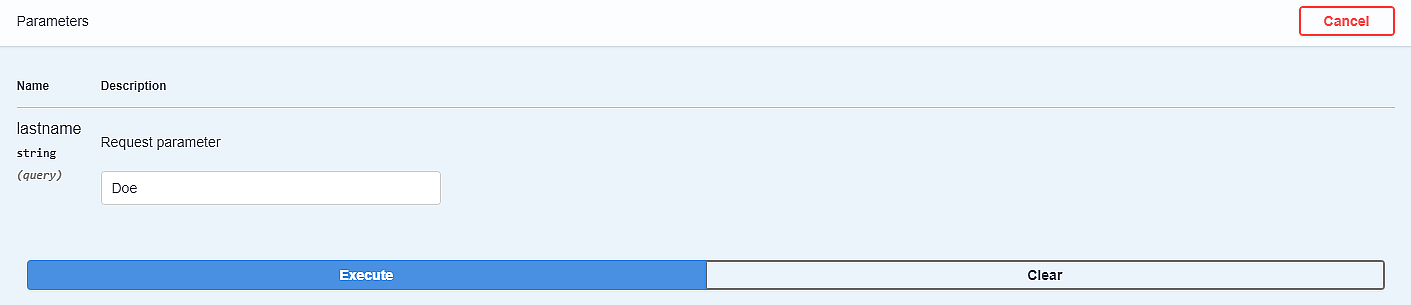
- Click Execute in the blue bar.
- The Response box displays the REST response. Since the family name in the request is not
Jones, the passenger is automatically shown in"Economy"class as follows: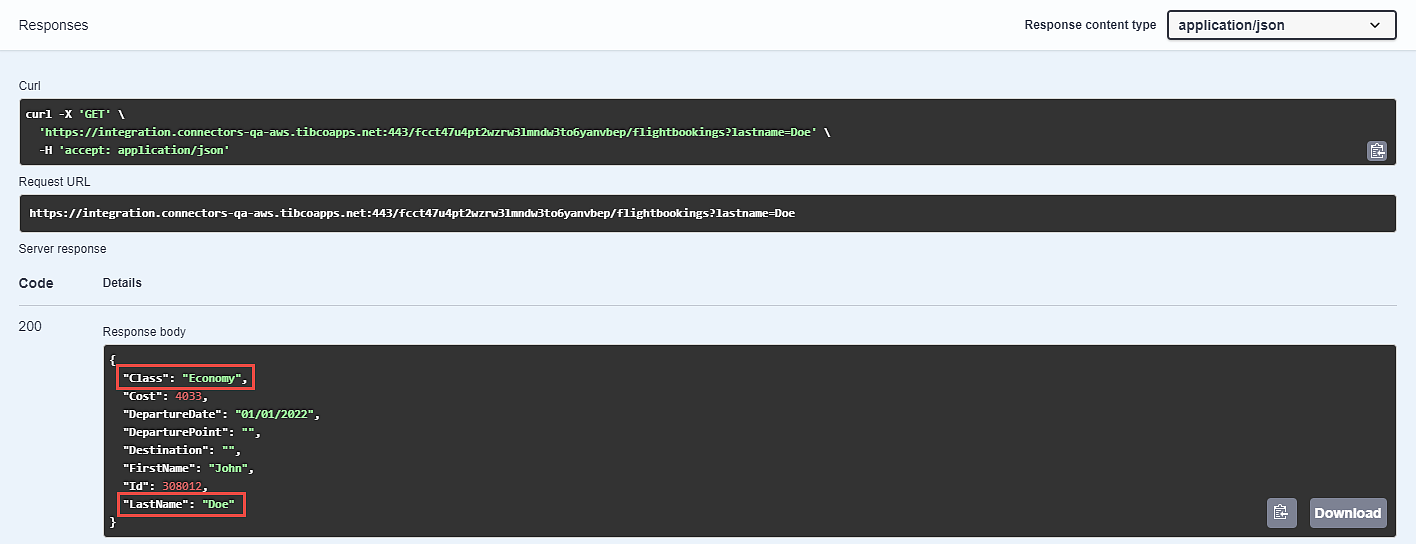
Next, run the APITester with LastName set to
Jonesand ensure that the Class is set to"Business"class. - Click Clear as shown below:

- Type
"Jones"for lastname value.Note: The string for the family name is case-sensitive. So,"Jones"is viewed as different from"Jones".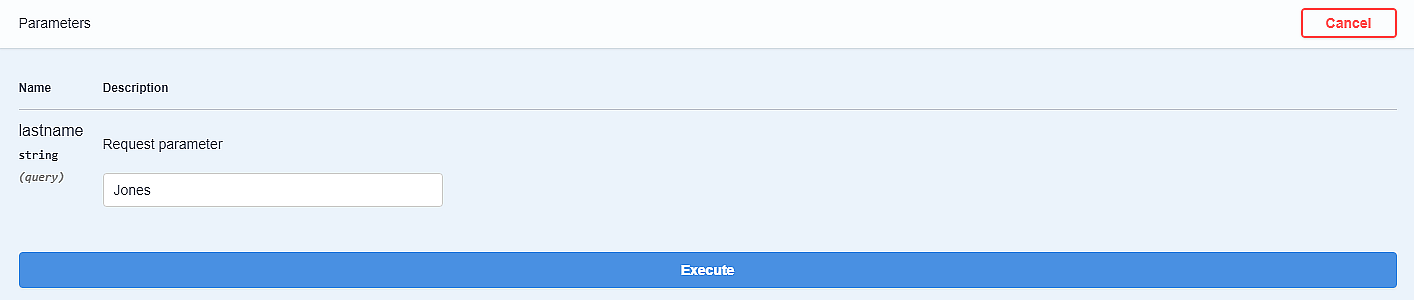
- Click
Execute in the blue bar. The Response body box displays the REST response. Since the family name in the request is
Jones, the passenger is automatically placed in"Business"class as shown below: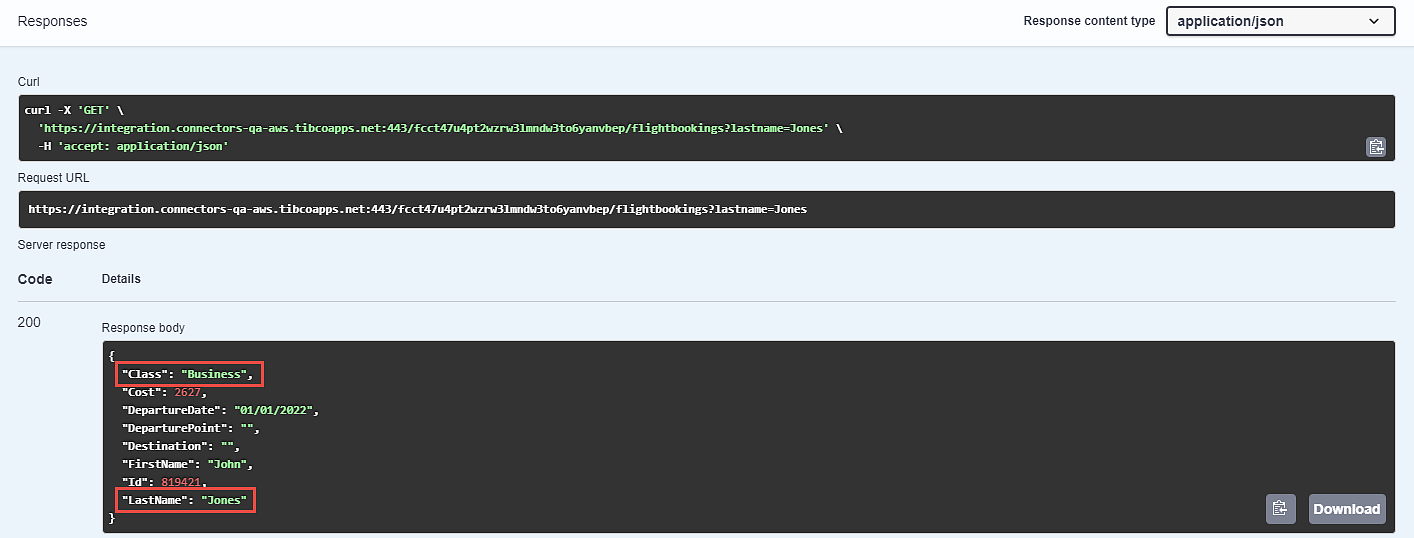
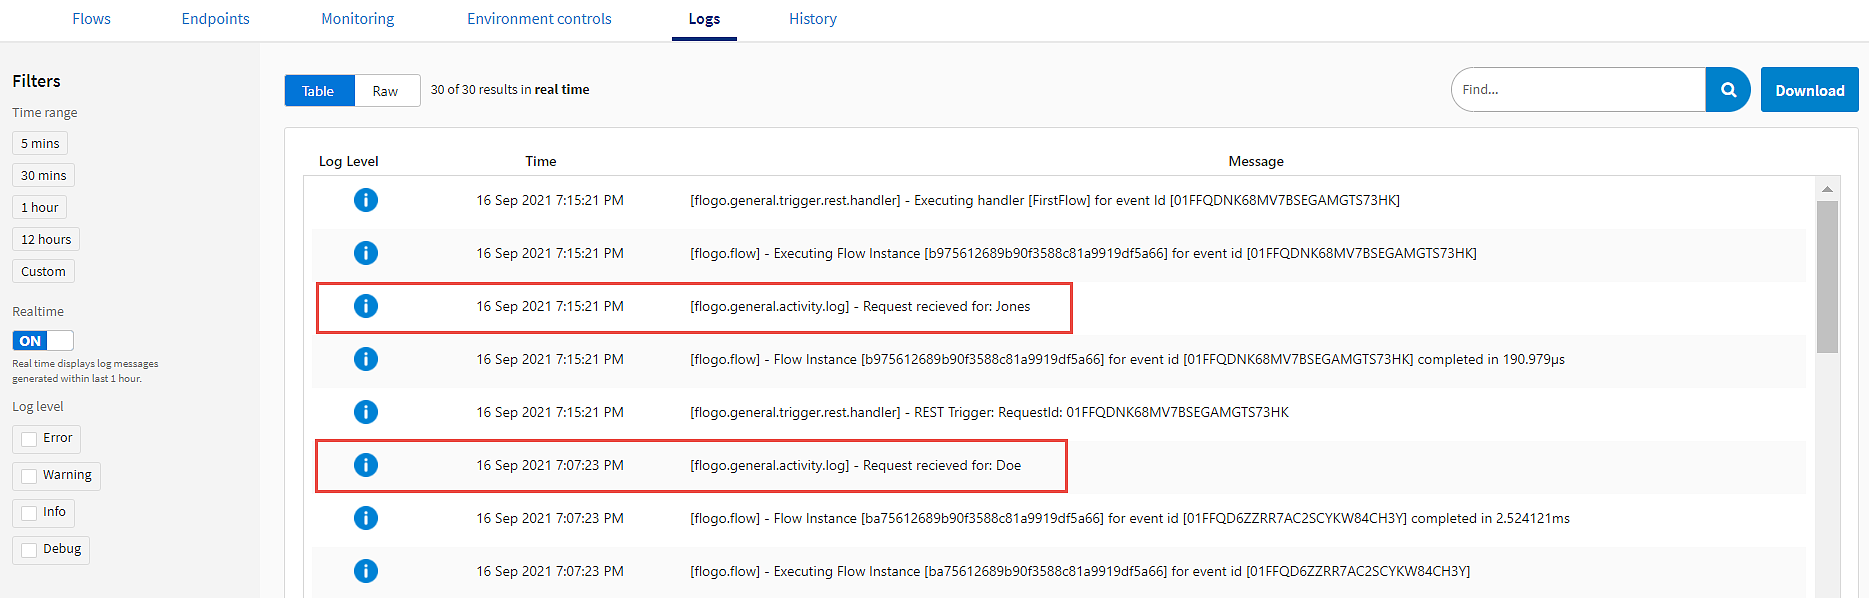
- Click the
Logs link to view the logs for the app.
The request that the ReceiveToHTTPMessage trigger logged is displayed.