InvokeRESTService
This Activity is used to request a REST service; it also accepts the reply returned by the service.
The Activity supports two modes of operation. The default mode supports arbitrary REST services. The TIBCO Cloud Mesh mode lets you select any services running in TIBCO Cloud and managed by your organization. For more information on TIBCO Cloud Mesh, see https://account.cloud.tibco.com/cloud/docs/cloud-mesh/index.html.
Settings
| Field | Description |
|---|---|
| Discover services from TIBCO Cloud Mesh | Discovers services from the TIBCO Cloud Mesh.
Default: False |
| Browse TIBCO Cloud Mesh Service |
Note: This field is displayed only if you are using TIBCO Cloud Mesh.
Name of the service you want to invoke. A dialog displays all services available in your organization. After selecting a service, select the path and method from the list. Note: While configuring the Activity with a service from
TIBCO Cloud Mesh, you might see a duplicate service name for existing services with multiple endpoints. If you see a duplicate service name, repush the Flogo service app.
|
| API Spec | (Optional) Click
Browse and browse to the file location on the machine. Select a JSON file.
Supported specifications are Swagger Specification 2.0 and OpenAPI Specification 3.0. |
| Resource Path |
Note: This field is only displayed
If you are using TIBCO Cloud Mesh: This is the resource path for the operation. It is automatically populated after you select a path from the Browse TIBCO Cloud Mesh Service dialog. This field is non-editable. If you upload a JSON file in the API Spec field: All resource paths available in the JSON file (that is, the Swagger 2.0 or OpenAPI 3.0 specification file you uploaded) are listed in the dropdown. Depending on the resource path you select, the supported operations are listed in the Method field. |
| Enable Authentication |
Select True if you want to enable authentication and authorization for your apps using the HTTP Client Authorization Configuration connection. Default: False |
| Authentication Connection |
Note: This field is displayed only if the Enable Authentication field is set to True.
Select a connection that you have set up from the dropdown list. For information on setting up a connection, refer to HTTP Client Authorization Configuration. |
| Method | Select an operation for the request. For example: GET, POST, PUT, DELETE, or PATCH.
If you are using TIBCO Cloud Mesh, this field is automatically populated after you select a method from the Browse TIBCO Cloud Mesh Service dialog. This is a non-editable field. |
| URL |
Note: This field is not displayed if you are using TIBCO Cloud Mesh.
An absolute path to the REST service that you want to invoke. For example:
Note: If you upload an OpenAPI 3.0 JSON specification file in the
API Spec field, the
URL is a dropdown list. This lists the server URLs mentioned in the JSON file. Select a server URL from the list.
Tip: To override dynamically the path provided in the URL, you can enter the URL as:
http://<host-url>:port/{path}Here, {path} is the parameter that can be modified. You can map this parameter in the Input section and assign values to it from the previous activities or the app properties. |
| Use certificate for verification |
This field is displayed if you enter an absolute path beginning with
Default: False |
| Use mTLS |
Set to True to enable mutual authentication for a secure connection to the server. Default: False |
| Client Certificate |
This field is displayed only if Use mTLS is set to True. This certificate is used to identify the client by the servers over TLS. The certificate must be PEM encoded. Click Browse and select the client certificate. Alternatively, you can configure the app property by using the Bind an Application Property toggle |
| Client Key |
This field is displayed only if Use mTLS is set to True. Click Browse and select the client key. The key file must be PEM encoded. Alternatively, you can configure the app property by using the Bind an Application Property toggle |
| CA/Server Certificate |
Click Browse and select a certificate authority (CA) certificate that verified the client's certificate or the server certificate to establish a secure connection during the TLS handshake. The certificate must be PEM encoded. Alternatively, you can configure the app property by using the Bind an Application Property toggle |
| Close Connection | Select True if you want to terminate the connection to the server after the response is processed. This affects the performance as the connection is no longer cached. Default: False |
| Timeout |
Specify the timeout period (in milliseconds) for invoking a service. If a timeout value is specified, the Activity waits for the specified time. If the response is not received by the specified time, the request expires with an error. Default: 0 milliseconds (that is, there is no timeout for invoking a service) |
| Request Type |
Note: This field is displayed only for the POST, PUT, and PATCH methods.
The Request content type of the REST service. The following content-type are supported:
Note:
|
| Proxy |
Specify the URL to the HTTP proxy server. If a proxy URL is specified, the request to the REST service (specified in the URL field) is routed via this proxy URL. Note: A secure connection to the proxy server is not supported.
Default: Proxy URL is disabled. |
 . Set the Base64-encoded value of the client certificate to the corresponding app property.
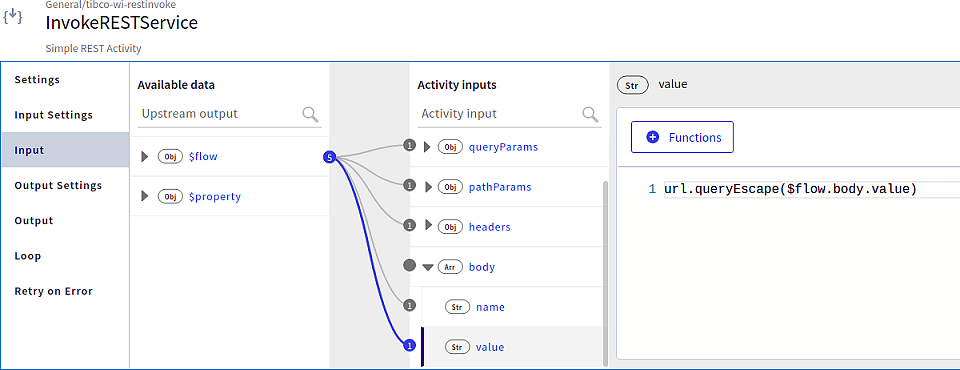
Input Settings
- If you upload a JSON file in the API Spec field, the fields in Input Settings are automatically populated according to the Resource Path you select.
- If you are using TIBCO Cloud Mesh, you do not need to configure input settings. The input settings are automatically configured to match the selected service, and cannot be changed.
- The InvokeRESTService supports
gzipanddeflateencoding.
| Field | Description |
|---|---|
| Query Params | Query parameters to be appended to the path. To add the query parameters, click  and press
Enter to save your changes. and press
Enter to save your changes.
|
| Path Params | Path parameters that are appended to the path. This is a non-editable field.
|
| Request Headers | Header values for the InvokeRESTService Activity. To add the header parameters, click and press
Enter to save your changes.
|
| Request Schema |
Enter a request schema here. This field is visible only if you selected the POST, PUT, PATCH, or DELETE method on the Settings tab. Note:
|
| Multipart Data |
This field is displayed in place of the Request Schema field if you select multipart/form-data as the Request Type on the
Settings tab. Click to add the parameters.
|
serviceAppId parameter is displayed in the Path Params field. This parameter indicates the Cloud Mesh service app ID. App properties can be mapped to this parameter that can be overwritten at runtime.You can use this parameter for CI/CD implementation. Push the service app to obtain the app ID. You can use the app ID to overwrite the
serviceAppId parameter that is configured in the input when TIBCO Cloud Mesh is enabled.Input
| Field | Description |
|---|---|
| host | Specify the value that must override the
hostname:port value specified in the URL at runtime with the value specified in this configuration. Enter a value in the form
hostname[:port] where
[:port] is optional.
|
| queryParams | Provide a value to the query parameters configured in the Input Settings section. |
| pathParams | Provide a value to the path parameters defined as part of the URL on the Settings tab. |
| headers | Header values for the Activity. These values can be manually entered or mapped to the output of the trigger or any preceding Activity. |
| body |
Request Schema values for the Activity. These values can be manually entered or mapped to the output of the trigger or any preceding Activity. This field is visible only if you selected the POST, PUT, PATCH, or DELETE method on the Settings tab. Note: For the DELETE method, specifying the request schema here is supported for manual configuration only and not when configured with Tibco Cloud Mesh and API specification.
|
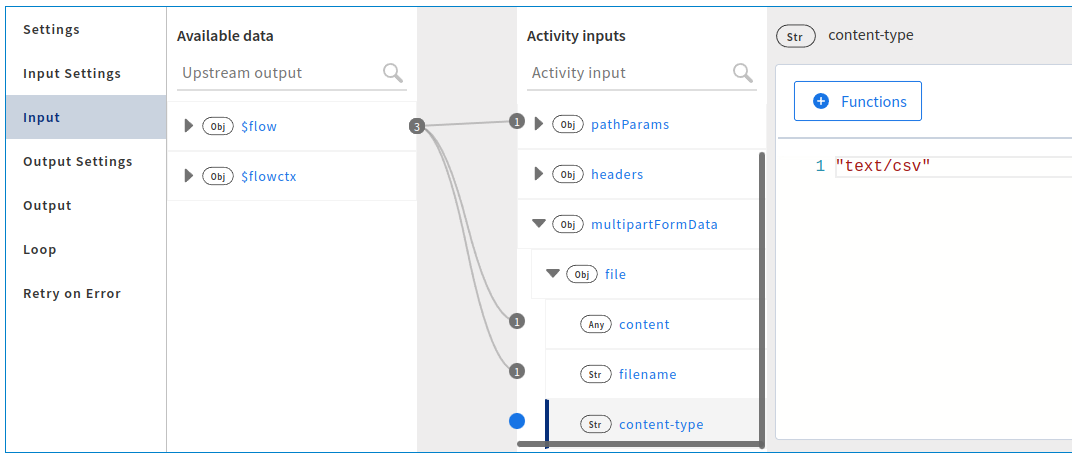
| multipartFormData |
This field is visible if you select file or files type in the Multipart Data field on the Input Settings tab.
Each file that you enter in the Multipart Data table is displayed here.
|
Output Settings
| Field | Description |
|---|---|
| Configure Response Codes | Use this field to configure response codes.
Default: False (See "Response Schema" and "Response Type" in this table.) To specify a response code, select
True and click
The response codes are displayed on the Output tab. |
| Response Schema |
Note: This field is displayed only when
Configure Response Codes is set to
False.
The schema for the reply that the server sends.
|
| Response Type |
Note: This field is displayed only when
Configure Response Codes is set to
False.
The content type of the REST service. The following content types are supported:
Default: JSON to XML conversion is not supported by the REST Activity. Any service that requires data in XML format cannot be invoked after providing data in the JSON format using REST Activity. |
| Output Format |
Note: This field is displayed only when the Response Type is set as
application/xml.The format of the requested content for the
|
| Response Schema |
Sample JSON schema for the response that the REST service returns. The JSON schema in this field is editable for the following settings only:
|
| Response Headers |
The header parameters for the reply. Tip: If you want to fetch a cookie coming with a response, add a new row with
Set-Cookie as the parameter. You can also map this parameter to subsequent activities in the flow. |
Output
The Output tab displays the headers and responsebody configured for the response in a tree format. The responseTimeInMilliSec parameter specifies the time taken to receive the response in miliseconds.
Loop
Refer to the section on "Using the Loop Feature in an Activity".
Retry on Error
Refer to the section on "Using the Retry on Error Feature in an Activity".