Create A Flow To Integrate Leads Into The Sample CRM Database
On Schedule App Tutorial
Integration flows are used for source to target integrations. In an Integration flow you configure connections to your source and target datastores, add operation blocks to your flow, and link data fields between the two datastores. Use the instructions below to create an Integration flow.
Flows are contained within apps that consist of the agent used to execute the flows, the flows themselves, and the schedule for running the app.
Objectives
Learn how to:
- Add an app.
- Create an Integration flow to move lead data from your Sample - Marketing database into your Sample - CRM database.
- Configure Connections for the flow.
- Add and configure operation blocks.
- Match source and target fields to determine how the data should be moved.
- Review Errors and Warnings.
- Use the Formula Editor.
- Run a single flow from within an app.
- View the app Execution History to see if records were successfully processed.
Add An Integration Flow
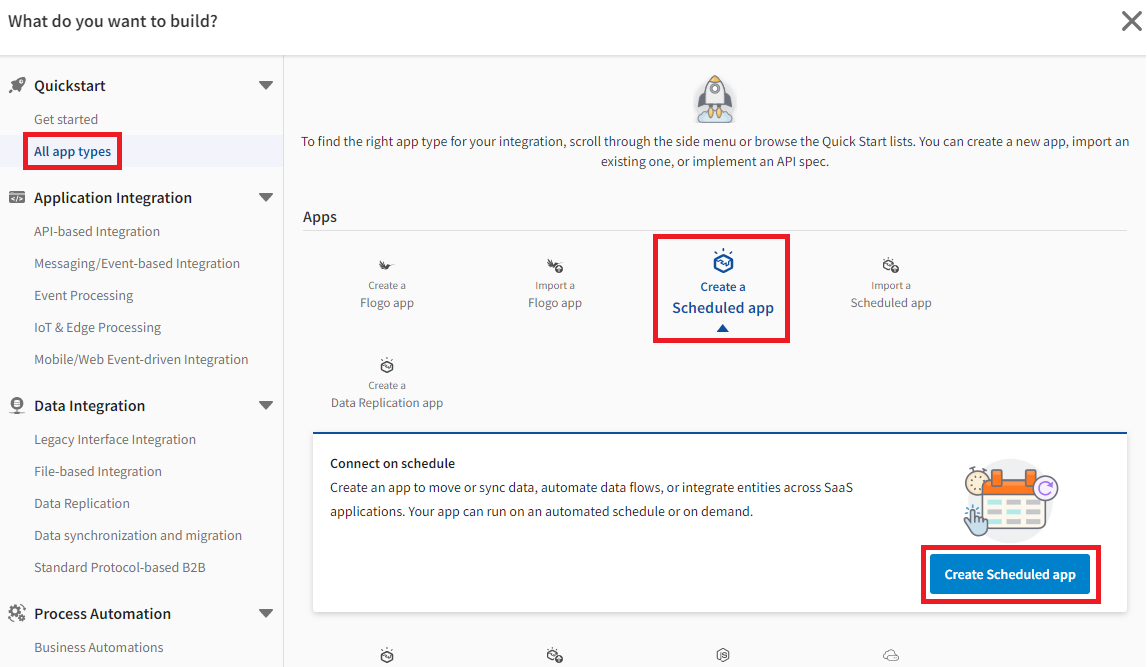
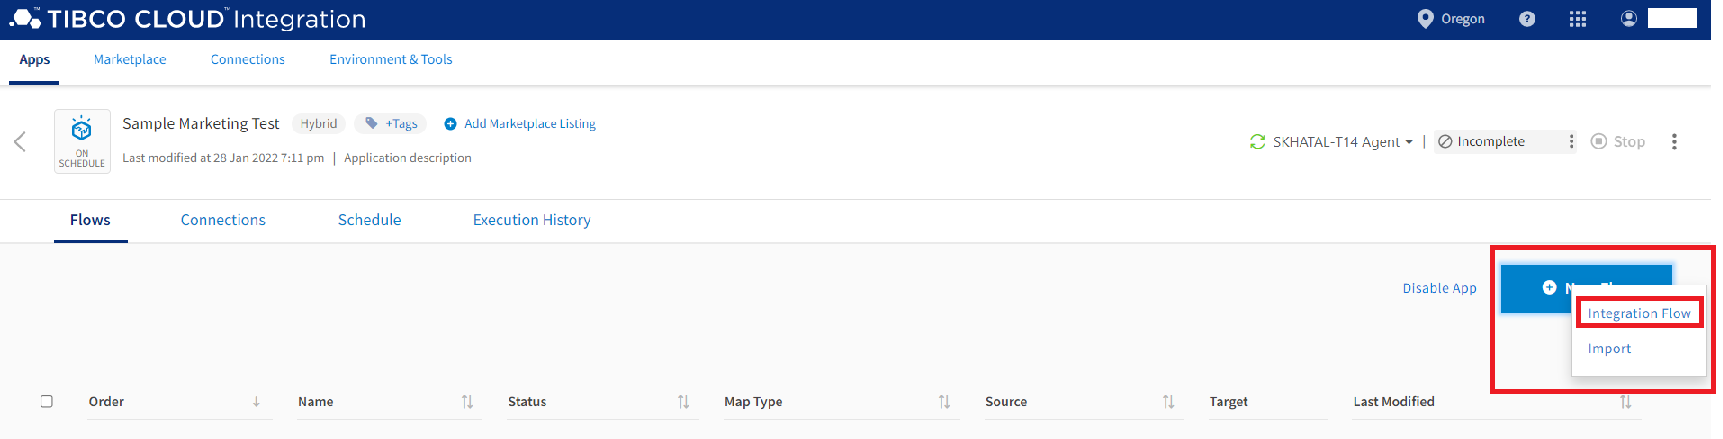
- Select Apps from the menu to open the apps list.
- On the apps page, select the Create/Import button to add your new app.
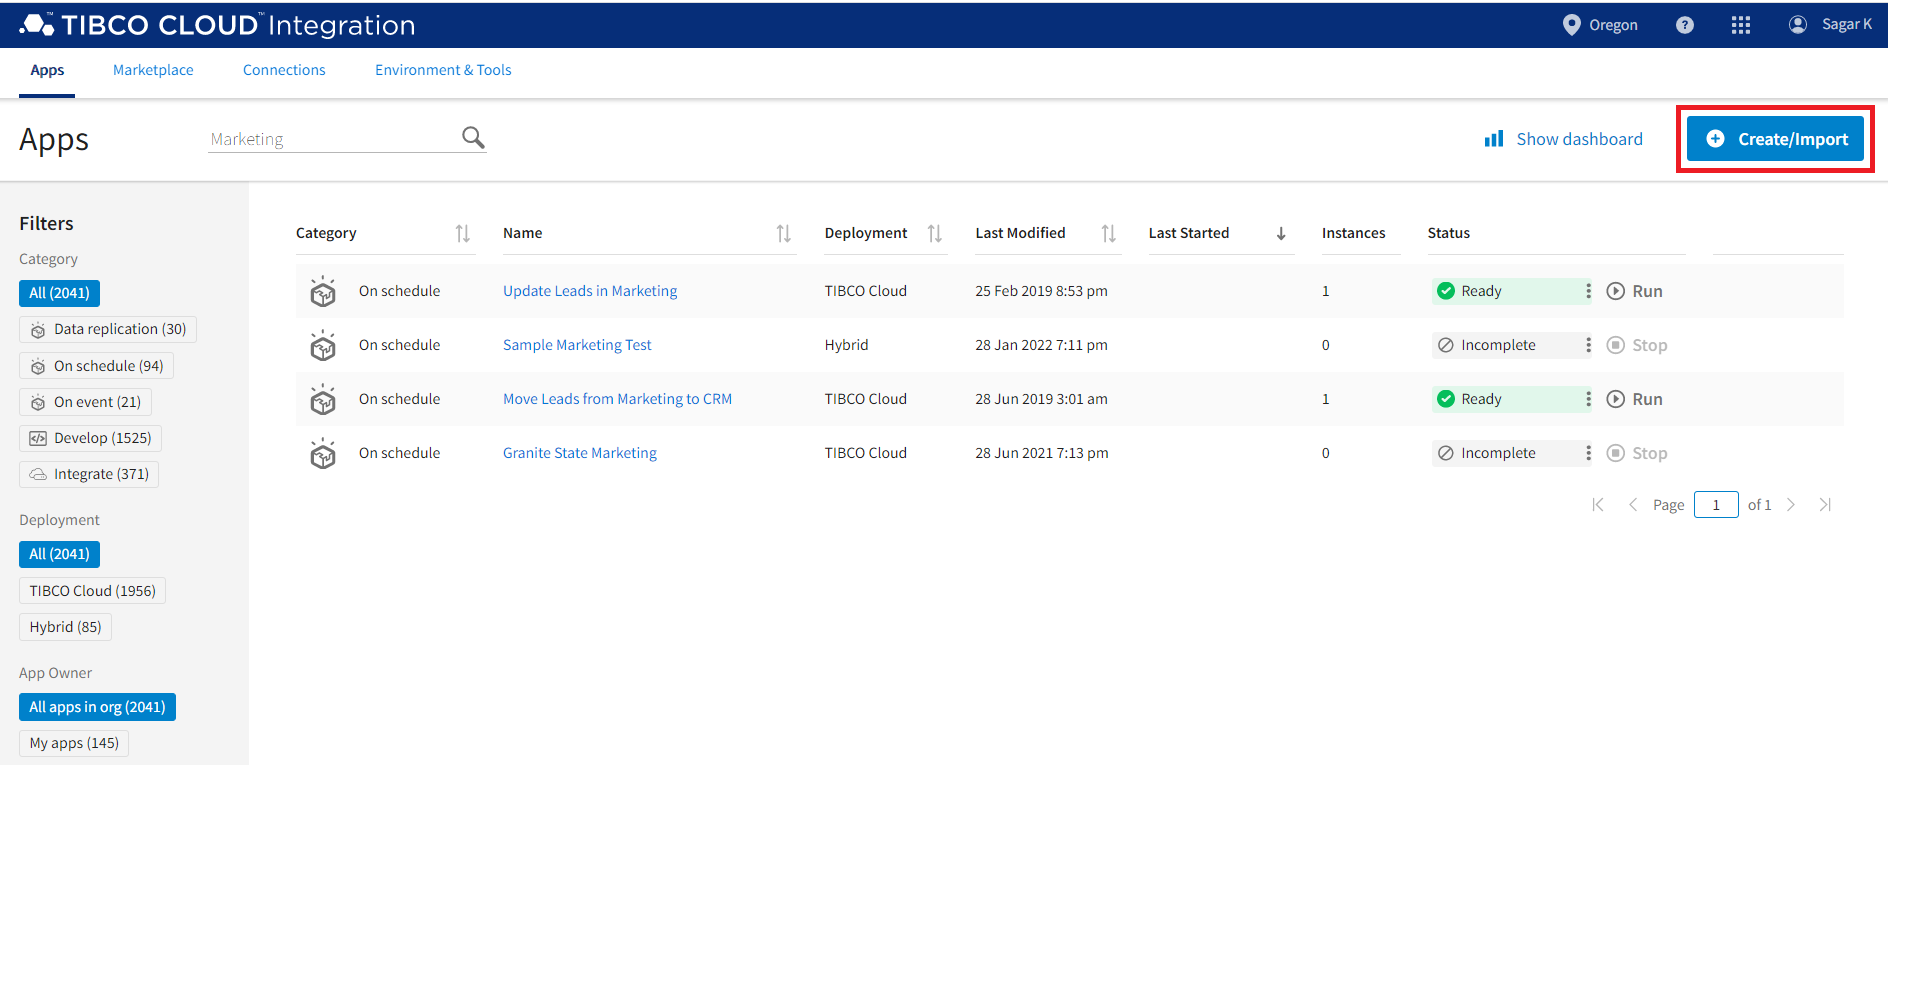
Apps Page — Create/Import App
- Select All app types>Create a Scheduled app.

- You can change the name of the app using the top left corner option. Select your TIBCO Cloud™ Integration - Connect Agent from the Agent drop-down.Tip: The TIBCO Cloud™ Integration - Connect agent is named using the name of your computer. For example, if the name of your computer is Ferrari, then the name of your agent is Ferrari Agent. If you have more than one Agent installed, a number is appended to the name.
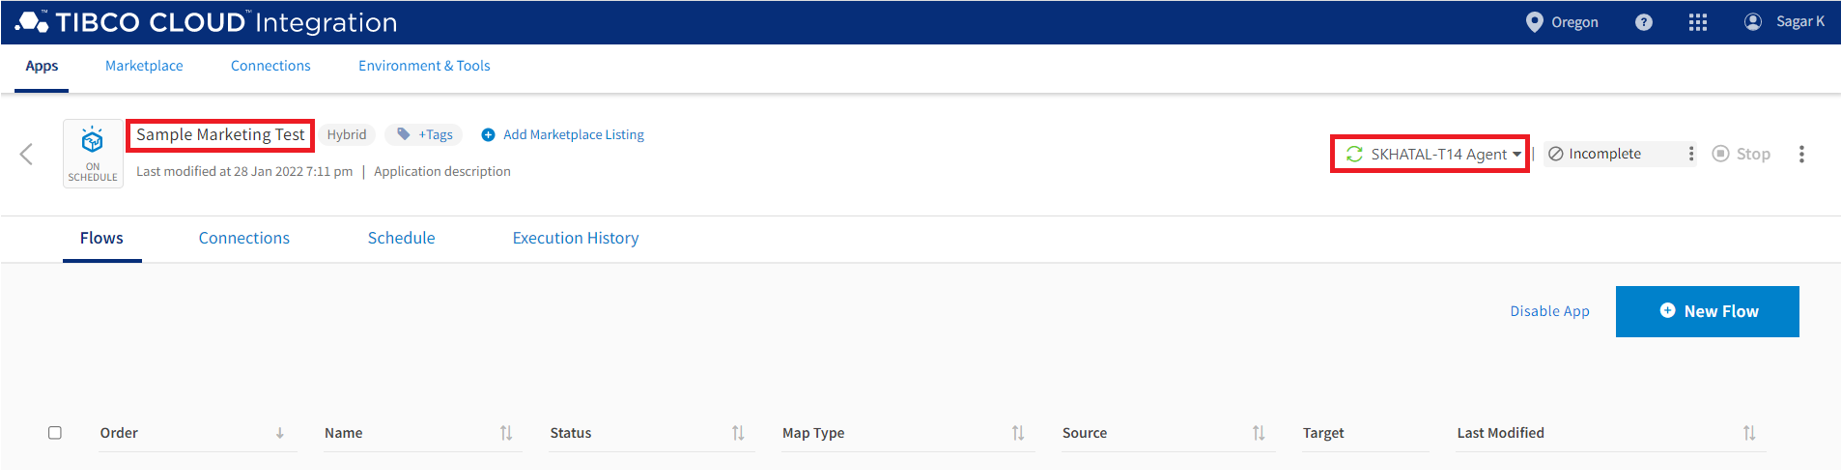
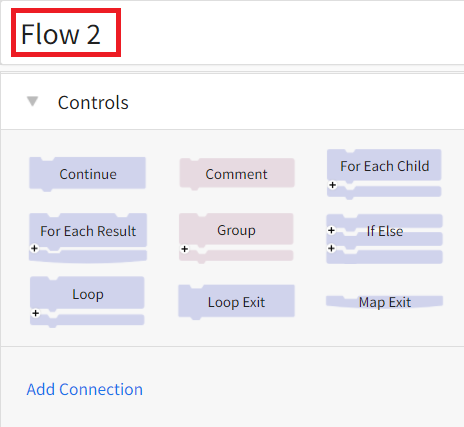
- Select New Flow>Integration Flow.

- You can rename the Flow using the top left corner option.

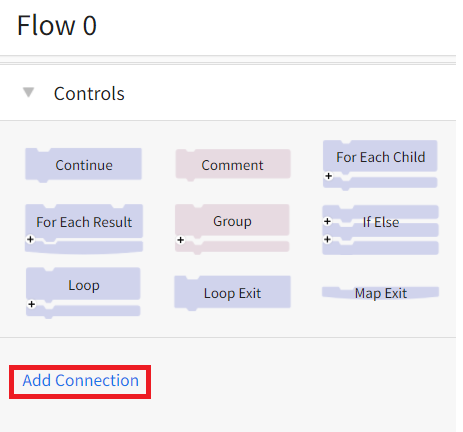
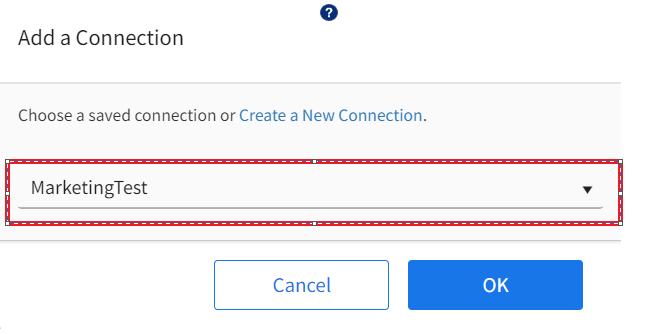
- In the Connection panel on the left, select the Add Connection link.
- In the Add a Connection dialog, select the MarketingTest Connection created in the lesson titled Configure A Sample Marketing Connection from the drop-down and select OK to add the Connection to the Flow or click Create a New Connection to create a new one.

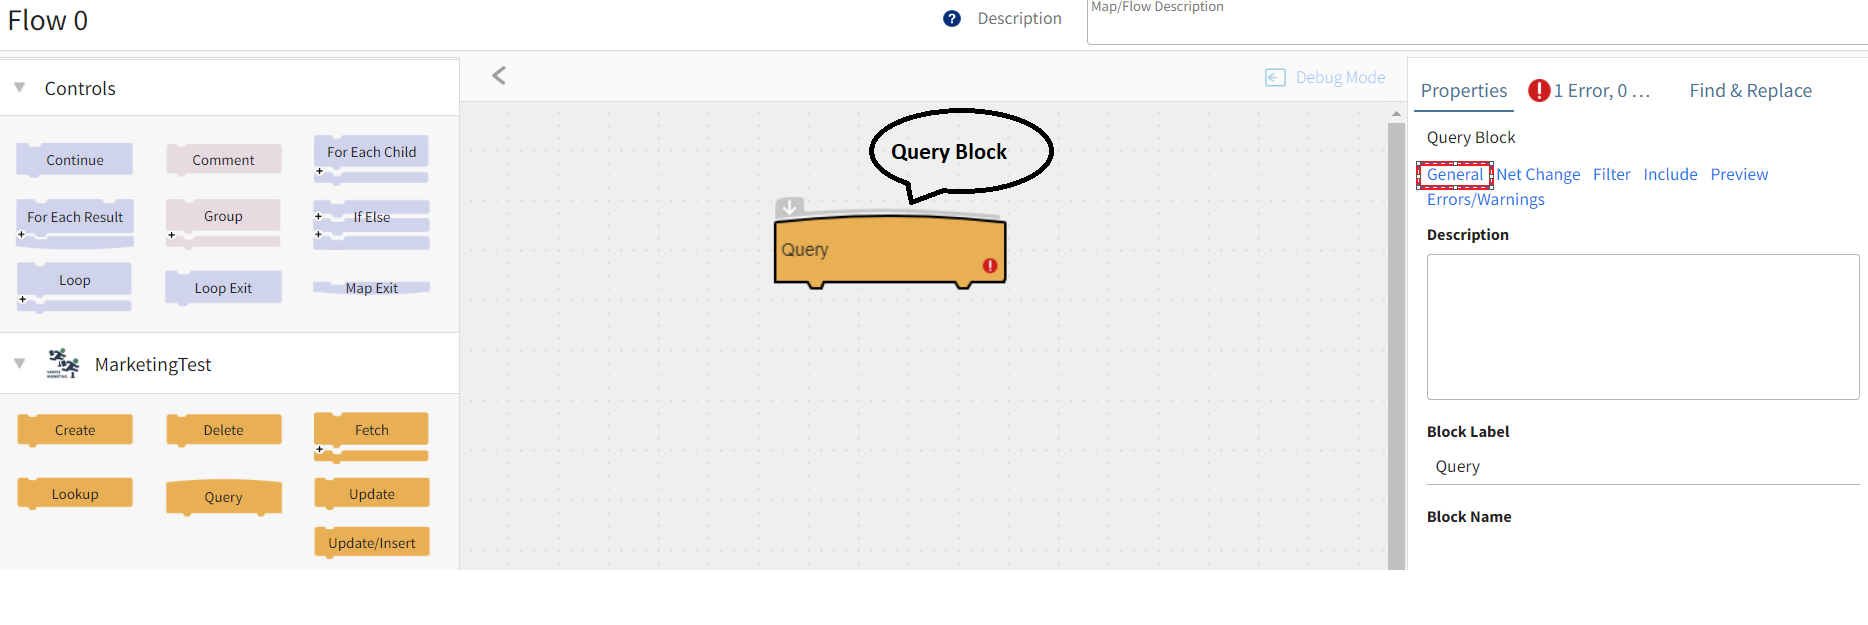
- Under the MarketingTest Connection on the left, select the Query Block and drag it on to the Flow workspace.
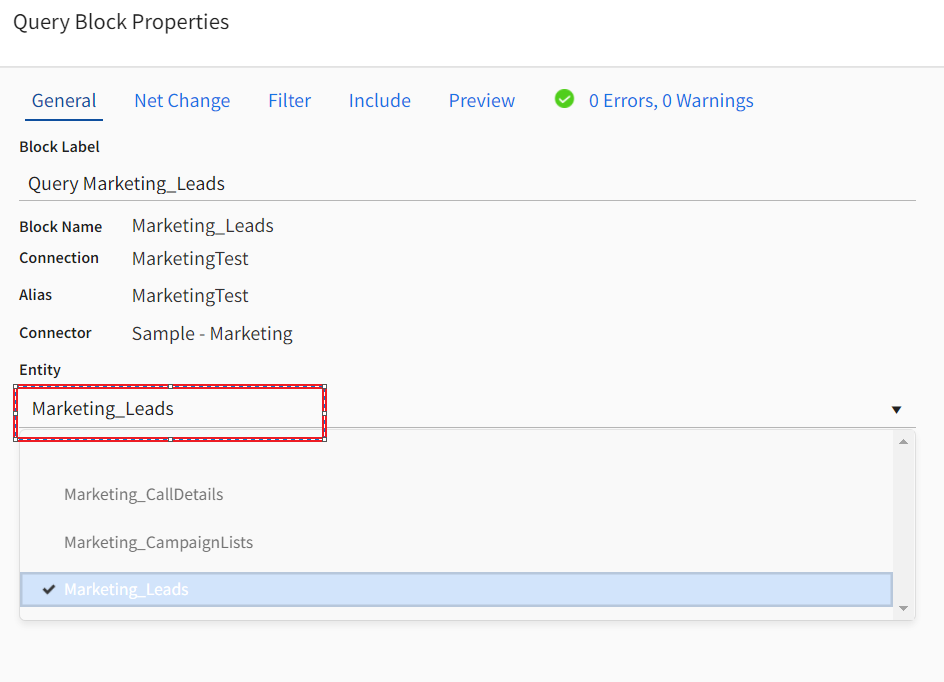
- Select the General link on the Properties tab on the right side of the workspace. The Query Block Properties dialog displays with the General tab selected.

- In the Entity field, select Leads.

- In the Connections panel on the left, scroll up to the Controls section and select the For Each Result Block.
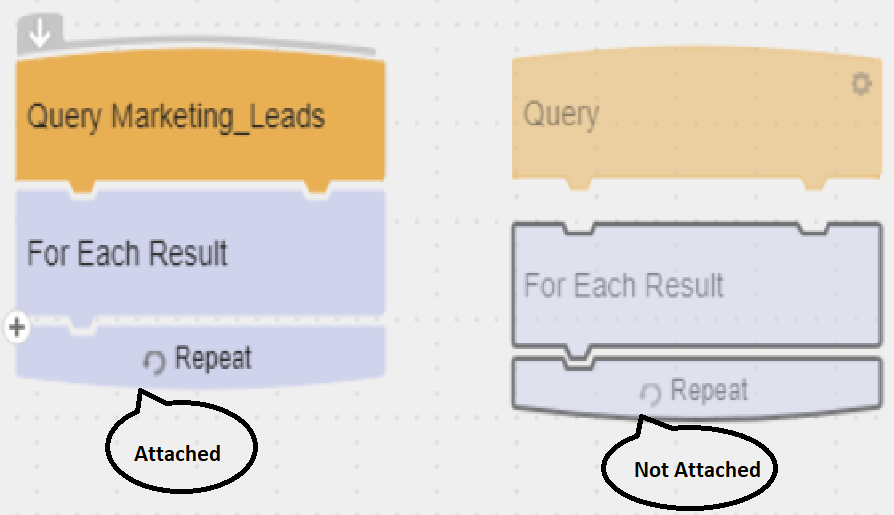
- Drag the For Each Result Block onto the Flow and put it under the Query Block. Make sure the Blocks are attached. If the For Each Result Block is transparent, as shown in the image below, it is not attached to the Query Block and the Flow cannot execute. The For Each Result block processes the results of the Query block one record at a time. For example, if the query returns 10 records, the For Each Result block takes the first record returned and runs it through any blocks contained inside the For Each Result block. Then, the next record is picked up and processed.

- In the Connection panel on the left, select the Add Connection link.
- In the Add a Connection dialog, select the CRMTest Connection created in the lesson titled Configure A Sample CRM Connection from the drop-down and select OK to add the Connection to the Flow.

- Under the CRMTest Connection on the left, select the Update/Insert Block and place it inside the For Each Result Block. The Update/Insert Block has an error icon
 indicating that it has not been configured or contains invalid information.
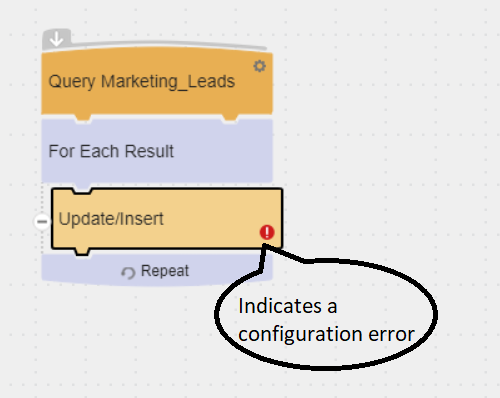
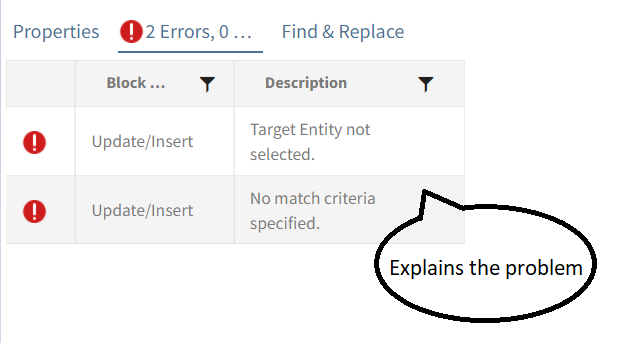
- Select the Errors and Warnings tab in the Flow workspace on the right panel to review the cause of the Error. The error information indicates that you have not selected an entity for the Update/Insert Block. You can see the same information on the Errors and Warnings tab in the Block Properties.

Errors And Warnings Tab — Flow Workspace

- Select the error in the Errors and Warnings tab on the Flow workspace to highlight the Block to which it refers.
- Open the Block Properties for the Update/Insert Block and select the CRM_Customer entity. The Error, Warnings tab indicates there are problems. This is normal because you are still missing configuration information.
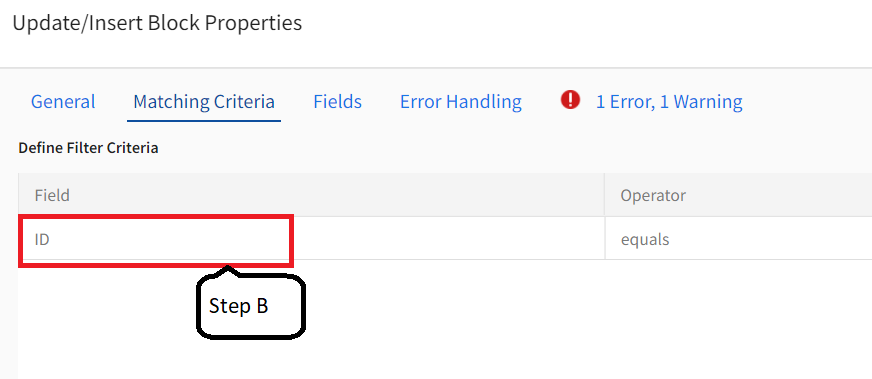
- Select the MatchingCriteria tab to compare duplicate records from the source with the records in the target database.
- Select
 .
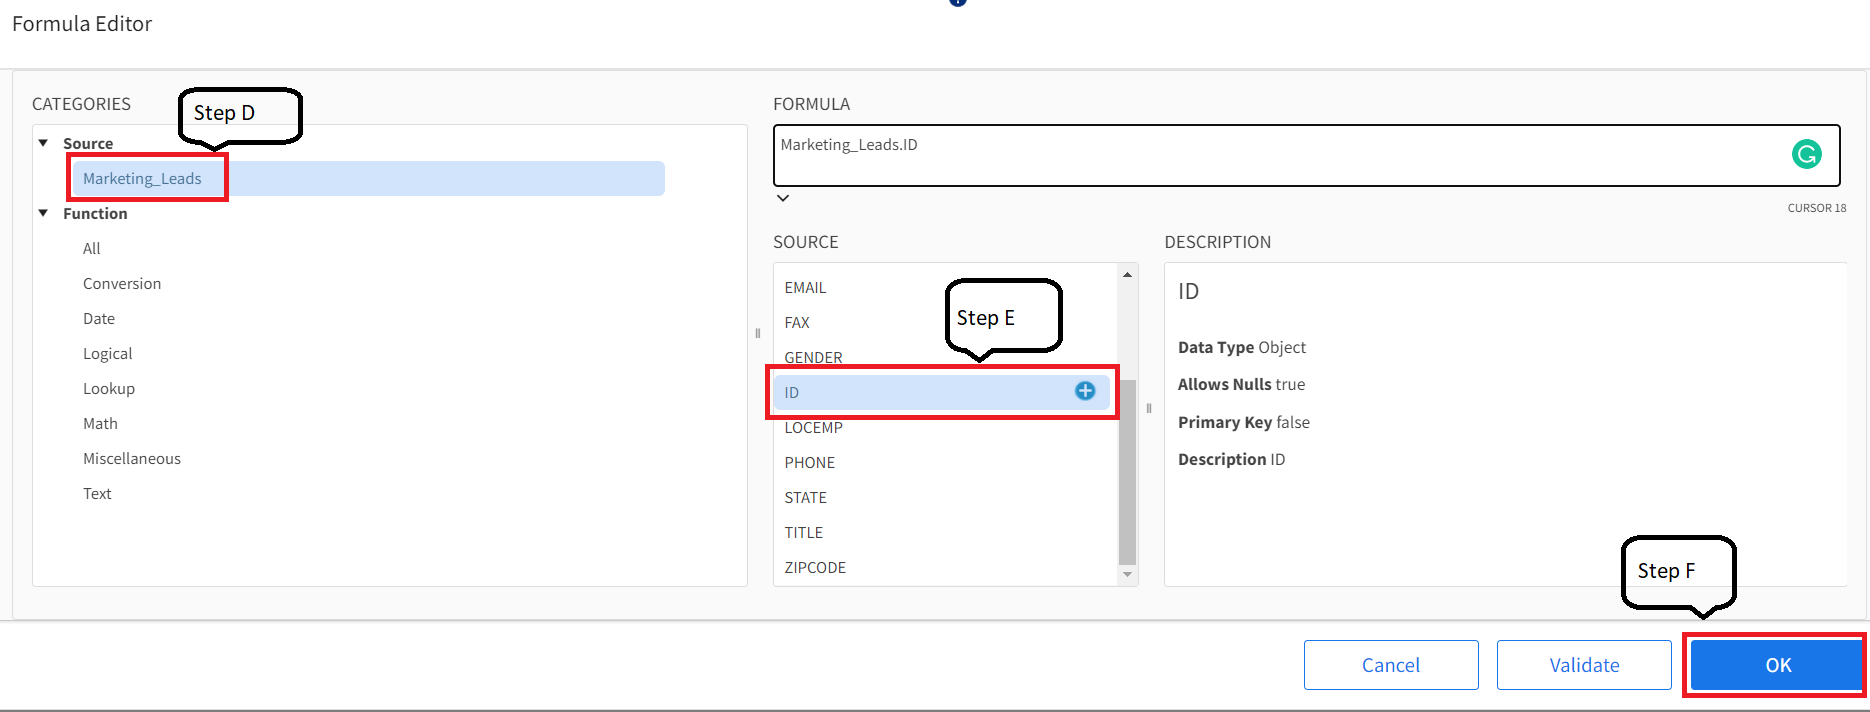
. - On the left side, select ID from the drop-down.
- On the right side under the Value, select Formula icon to open the Formula Editor
 .
. - Select Categories>Source>Marketing_Leads.
- In the Formula Editor, select icon next to the ID under the Source.
- Select OK.


- Select
- Select the Fields tab to display the source and target fields associated with the entities you selected in the Query and Update/Insert Blocks. Use the Fields tab to link fields from the source to fields in the target. Links can be simple or contain complex formulas that use the TIBCO Cloud™ Integration function library, operators, source fields, and constants to transform data during an integration.
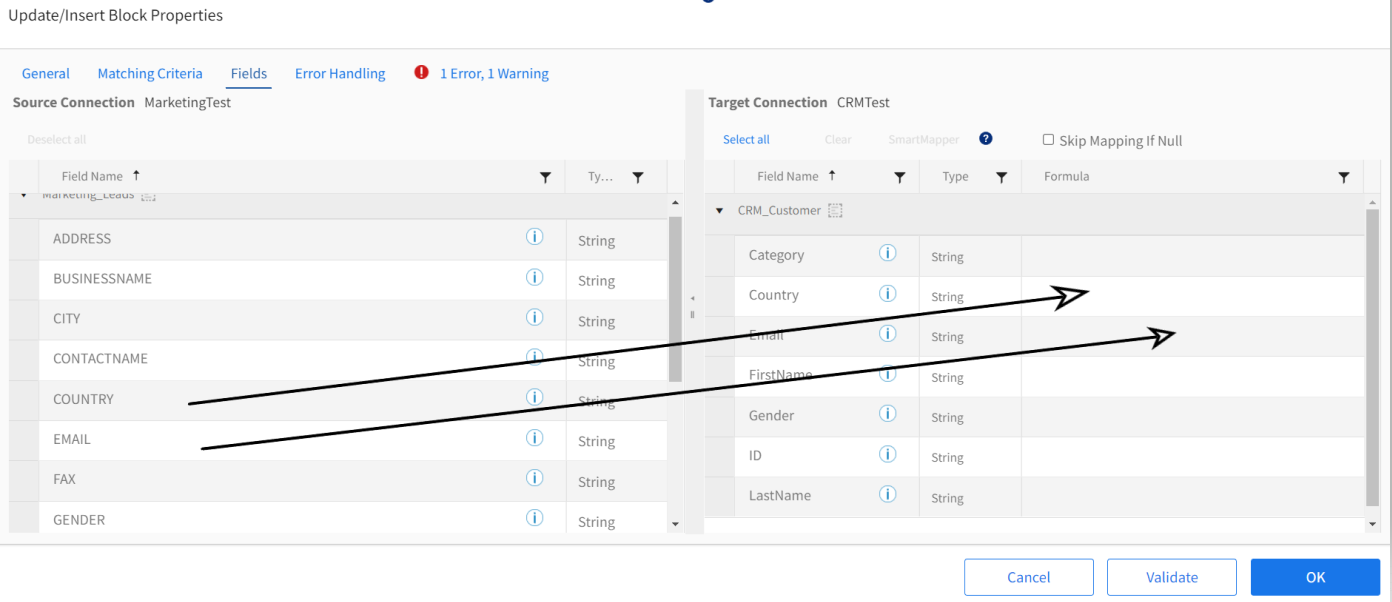
- Select COUNTRY in the source list, drag it to the target list and drop the field onto the Country field. Now those two fields are linked. When the flow runs, data in the COUNTRY field is placed in the Country field in Sample CRM.
- Link the following fields manually as follows:
- Drag EMAIL to Email
- Drag GENDER to Gender
- Drag ID to ID
- In the Source, the CONTACTNAME field contains the Lead's First and Last names. In the Target, each part of the Lead's name is stored in a separate field. To integrate the data correctly, you must use a formula to return individual parts of the name, and place First, and Last names in the appropriate target fields. Drag CONTACTNAME to Lastname, which is a required field.
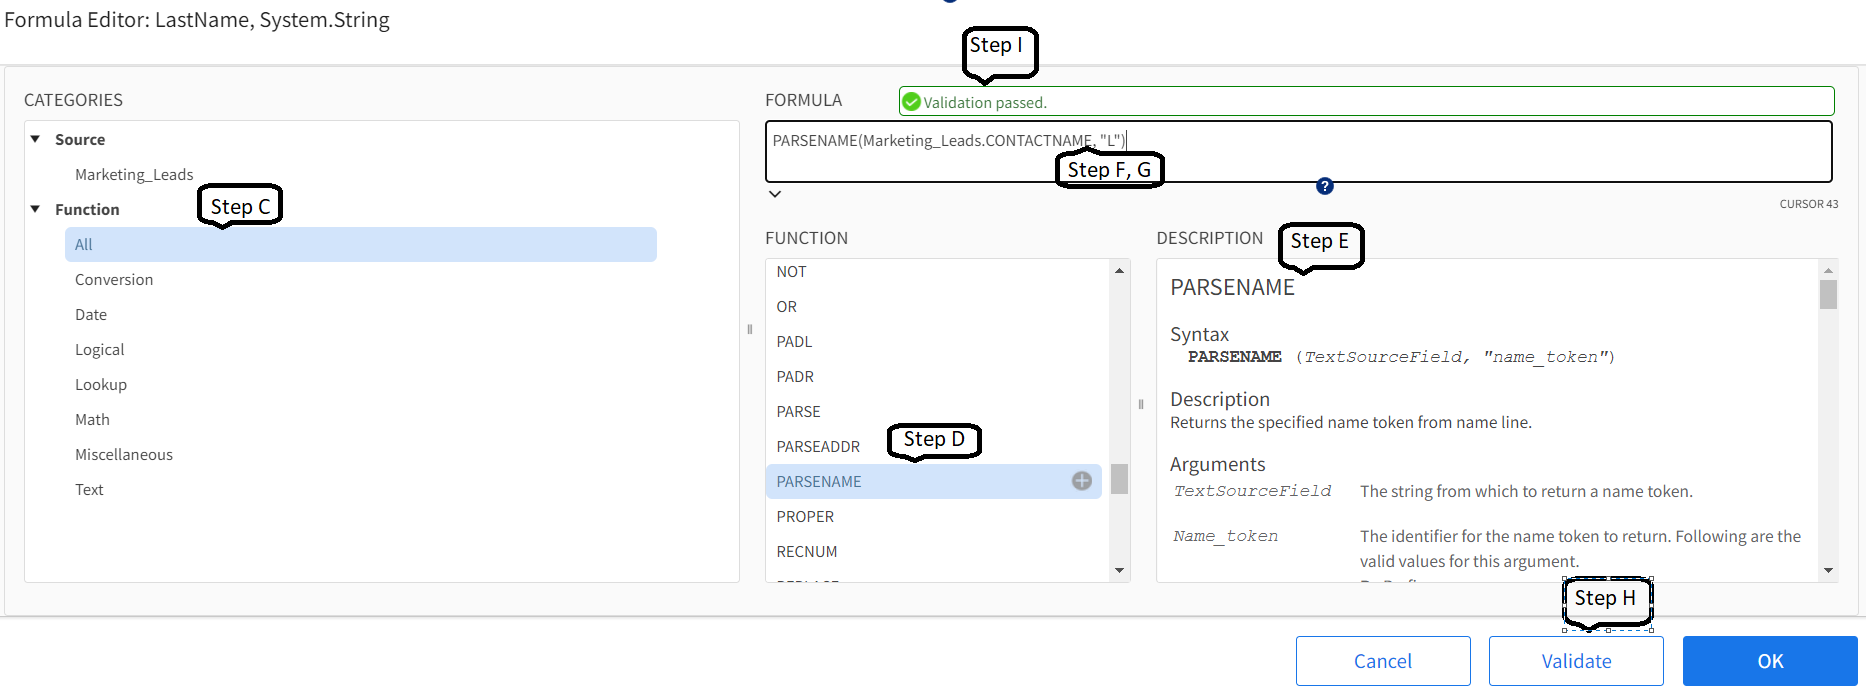
- Select the Formula icon next to LastName in the Formula column to display the Formula editor.
- Highlight Marketing_Leads in the Formula panel.
- In the Categories panel select Functions>All.
- In the Functions panel locate PARSENAME and select the Insert icon .
- The Description panel provides information about how to use the PARSENAME function.
- The Formula panel contains the PARSENAME function with the Marketing_Leads.CONTACTNAME field in parenthesis.
- After Leads.CONTACTNAME type a comma and "L" for Last Name. This indicates that the PARSENAME function should return the Last Name information from the CONTACTNAME field. The entire function should be as follows:
PARSENAME(Marketing_Leads.CONTACTNAME, "L") - Select Validate to make sure the format of the formula is correct.
- Review the message above the Formula field.
- Select OK to save the formula in the target Lastname field.
- Select the Formula icon
- Drag CONTACTNAME to Firstname and repeat the process for adding a formula to return just the First name. When you are finished mapping fields, the Target panel should have links for all of the Source fields except Category.
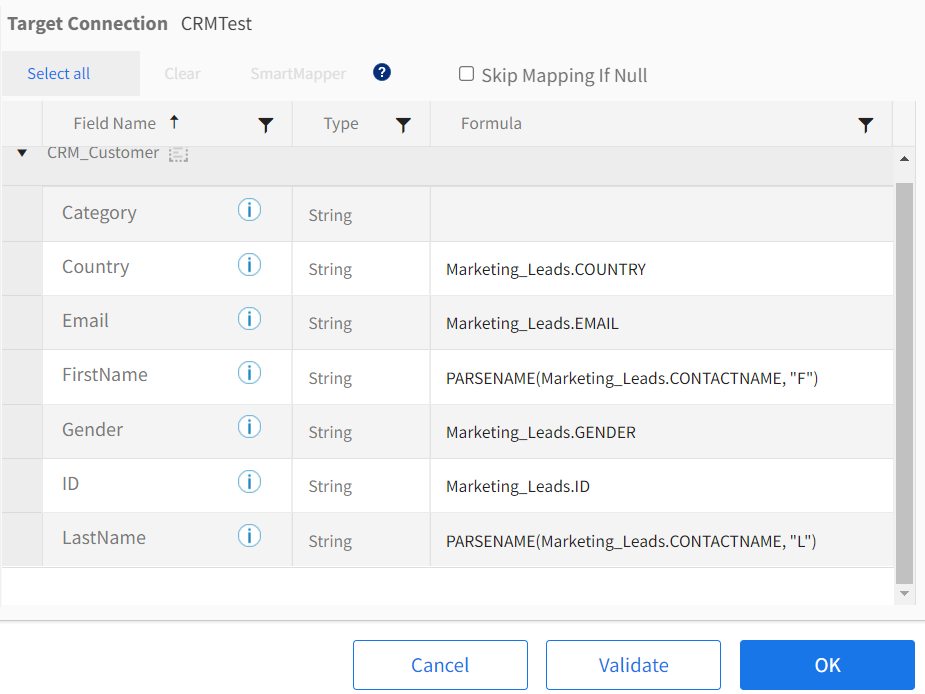
Linked Fields
- In the Target field list, scroll down to the Category field and in the Formula field type "Connect Tutorial", including the quotation marks. Adding "Connect Tutorial" to this field marks the records added to Sample CRM as part of the Tutorial. Later you can use this field as a filter to locate and delete the records added during the Tutorial.
- Select OK to save the Insert Marketing Leads Flow and return to the Flows list on the App page.
- Select the Run Flow option from the menu
 to run this single Flow.
 - Select the Execution History tab to view the Execution History for your Flow. The Execution History indicates that 15 records were successfully processed.

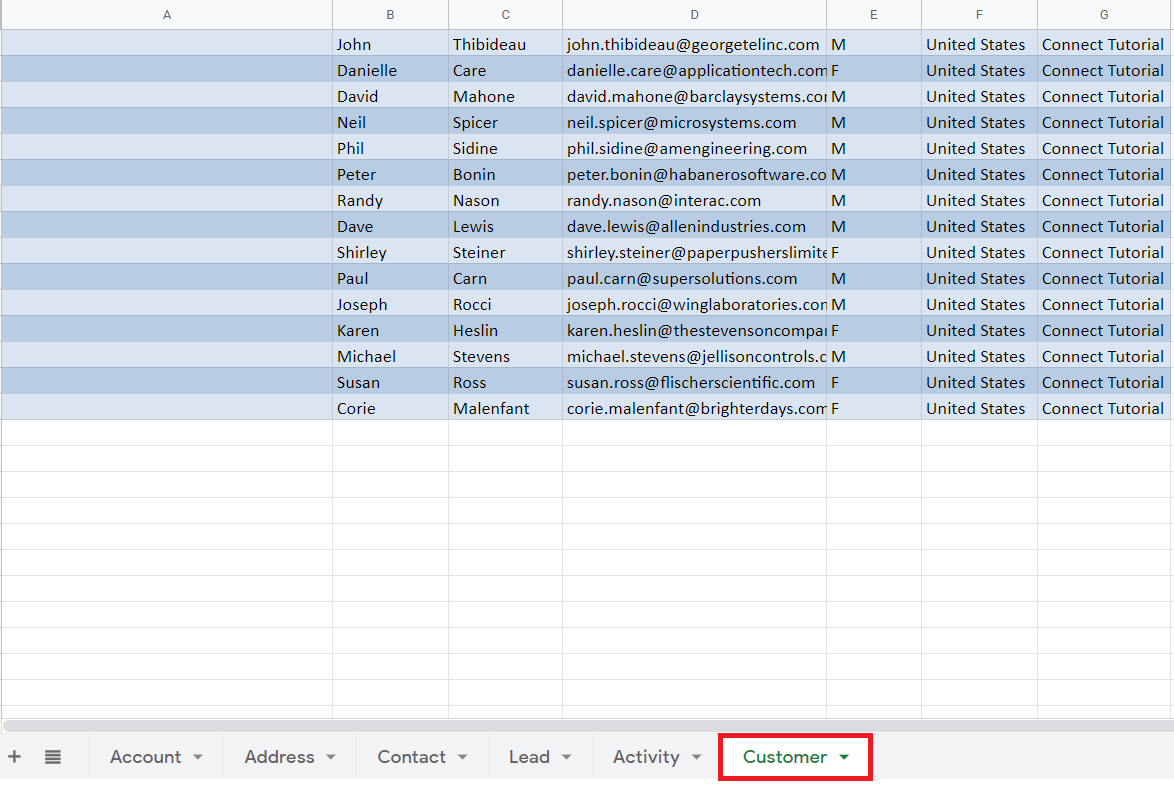
- To see the processed records, open CRM.xlxs which is located at C:\Program Files (x86)\Scribe Software\Scribe Online Agent\Connectors\Sample.Connector.CRM or import it to a Google spreadsheet and go to the Customer sheet.


Return to On Schedule App Tutorial Overview to select the next lesson.