Resource Operations Activity
Use the Resource Operations activity to create, read, update, or delete the FHIR resource on the specified FHIR server. You can also perform Batch and Transaction operations only specific to the bundle resource.
![]()
General
The General tab contains the following fields:
| Field | Literal Value/Module Property/Process Property? | Description |
|---|---|---|
| Name | No | Enter the name to be displayed as a label for the activity in the process. |
| FHIR Context | No | Points to the desired FHIR server |
Display existing FHIRContextPropertiesDisplays

If multiple properties are created, select one from the list. |
||
| Create a new process property
|
||
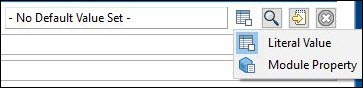
| Set default property values
To select the Default Value Set for the property, click
|
||
| Select FHIR Resource
To create or choose a FHIR resource, click,
Choose/Create Default Resource Value For more information about creating a FHIR resource, see Select FHIR Resource Template. |
||
| Edit Default Resource
To edit the default resource, click
Edit Default Resource |
||
| Clear Value
To clear the current value from the existing FHIRContextProperties display, click
Clear Value |
||
| FHIR Resource | No | The FHIR resource.
Depending on the server version you select, different FHIR resources are supported. For more information about the supported FHIR resources, see Supported Resource Types. |
| Operation | No | The type of operation to be performed on the selected FHIR resource:
Note: The Batch and Transaction operations are available only for the Bundle FHIR resource. You can use these operations to submit a set of actions such as HTTP POST, PUT, GET, and DELETE, to be performed on an FHIR server in a single HTTP request. The actions might be performed independently as a batch or as a single atomic transaction.
|
| Use Input Editor | No |
Select the Use Input Editor checkbox to insert input through the Input Editor tab. |

 :
:

Description
The Description tab is used to provide a short description of the activity.
Input Editor
You can use the Input Editor tab to import an FHIR schema from external sources for the following BW FHIR activities.
If you want to generate XML schemas for the FHIR resource using the Schemagen utility, see Generating XML Schemas Using the Schemagen Utility.
-
ResourceOperations: Input Editor is on Input tab
-
SearchForResource: Both Input and Output Editor tabs are present
-
EncodeResource: Input Editor is on Input tab
-
ParseResource: Output Editor is provided on the Output tab
You need to provide the following schemas generated by the SchemaGen utility to use the Input Editor feature:
-
Create: inputCreate<ResourceName>.xsd
-
Read: outputRead<ResourceName>.xsd
-
Update: inputUpdate<ResourceName>.xsd
-
Delete: inputDelete<ResourceName>.xsd
-
Batch: inputCreateBundle.xsd (For Bundle Resource)
-
Transaction: inputCreateBundle.xsd (For Bundle Resource)
Input
The Input tab is populated based on the selections made for FHIR context, Resource type, and Operation type.
For example, requests which involve the Appointment resource display the FHIR template for that resource.
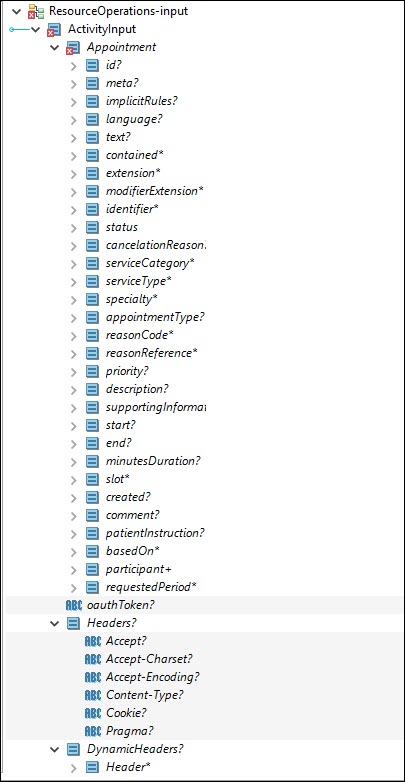
| Field | Datatype | Description |
|---|---|---|
| oauthToken | string | Is used to authorize the request against the FHIR server. |
| Headers | - | Any additional information with an HTTP request or response can be passed through the headers. These are standard HTTP headers. |
| DynamicHeaders | - | Any customized header apart from the standard header can be passed through dynamic headers. |
For more information about the supported resource types, see the FHIR STU3 and FHIR R4 documentation.
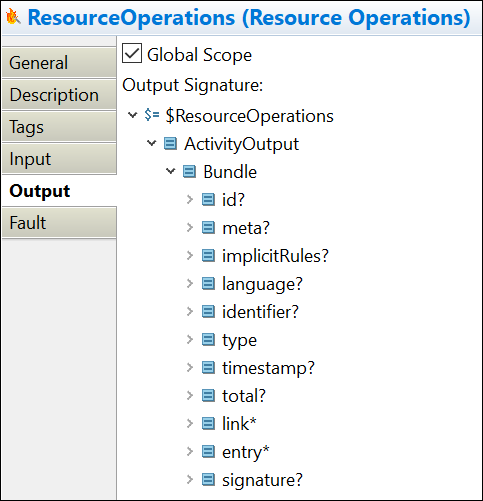
Output
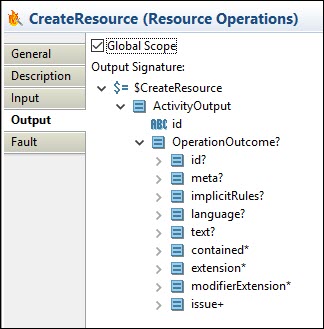
The Output tab is populated based on the operation selected. An OperationOutcome object might also be returned with an ID.
Example 1: If you perform a create, delete, or update operation, the ID of the created, deleted, or updated FHIR resource is returned.
Example 2: If you perform a read operation, the resource is returned. This example shows the Practitioner resource displayed on the Output tab.
Example 3: If you perform a Batch or Transaction operation on a Bundle resource, it returns a Bundle resource. The example shows the Bundle resource displayed on the Output tab.
| Output Item | Datatype | Description |
|---|---|---|
| OperationOutcome | element | You can use it to determine the results of the operation.
The following OperationOutcome properties can help you diagnose an error. Expand the issue property to view these properties.
|
For more information about the supported resource types, see the FHIR R4 and FHIR STU3 documentation.
Fault
The Fault tab lists errors that might occur when you use this activity.
| Error Schema Element | Datatype | Description |
|---|---|---|
| msg | string | Error message description |
| msgCode | string | The error code.
It represents the TIBCO ActiveMatrix BusinessWorks™ Plug-in for HL7 with FHIR errors. For more information about the error codes, see FHIR Error Codes. |
| OperationOutcome | string | The issue description in case of failure of the activity in a process.
The following OperationOutcome properties can help you diagnose an error. Expand the issue property to view these properties.
|
To perform Batch and Transaction operations with the help of import schema, you must select the Bundle resource.
Generating XML Schemas Using the Schemagen Utility
Schemagen utility generates XML schemas for an FHIR resources. The utility is packaged as a runnable jar and can be run on the command prompt. With the Schemagen utility, you can generate operation specific schemas for both existing and new set of resources.
The Schemagen utility uses a config.properties file to take input parameters.
Before you Begin
Ensure that Java 1.8 is installed before configuring the Schemagen utility.
Configuring the Schemagen Utility
If you want to change the default configuration, then perform the following steps:
-
Download the SchemaGen-utility.zip folder and then extract it in a folder.
-
In the extracted folder, you find the following files:
Files Description Fhir-files input files required for the utility fhir-schemaGen-util {version}.jar schemagen utility jar config.properties -
Configurations that are used by the utility to generate the schemas and search parameters. These configurations can be changed based on your requirement. The configurations are as follows:
-
Input files - fhir-single.xsd (STU3, R4), Fhir definitions zip (STU3, R4) & search-parameters.xml
-
Server version - FHIR server version (STU3/R4)
-
Resource name - FHIR resource for which schemas and search parameters must be generated. Multiple resources can be added to this parameter by providing comma-separated FHIR resource names
Note:Resource Name is case sensitive.
-
-
Download the input files from Fhir definitions zip (STU3 and R4) and fhir-single.xsd (STU3 and R4). After downloading the files, extract the search-parameter.
For more information, see Example: Creating the Schema files.
-
After downloading the files, extract the search-paramter.xml from the definitions.xml. zip file.
-
Rename each file by appending the respective server name to the fhir-single.xsd and search-parameter.xml. You must provide the server name at the end of the file name separated by an underscore.
Example: Creating the Schema files
-
From the STU3 link, download the fhirsingle.xsd file and rename it to fhir-single_stu3.xsd.
-
Provide the path to these files to the
config.propertiesfile or you can copy the files to /Fhir-files folder and replace the default files. -
Change the
SERVER_VERSIONproperty inconfig.propertiesbased on your requirement. -
For generating schema, give comma separated FHIR resource names in
RESOURCE_NAMEfor schema generation. If you want to generate schemas for the default resources, then keep this field blank. Else, you can create a copy of theconfig.propertiesfile and change the parameters, and then provide the path of the file in the execution command. -
Open Command Prompt on your system and run one of the following command to create schema files:
java -jar fhir-schemaGen-util-{version}.jar config.properties.or
java -jar fhir-schemaGen-util-{version}.jar <path to config.properties>.
Running the Schemagen Utility
To run the Schemagen utility with default configuration settings, follow these steps:
-
Download the SchemaGen-utility.zip folder and then extract it in a folder.
-
Open command Prompt and run the command
java -jar fhir-schemaGen-util-{version}.jar config.properties
Importing the Schema files to BusinessWorks Studio
You can find the generated files in the output folder. You can import the files in the BusinessWorks application module project in the following way:
-
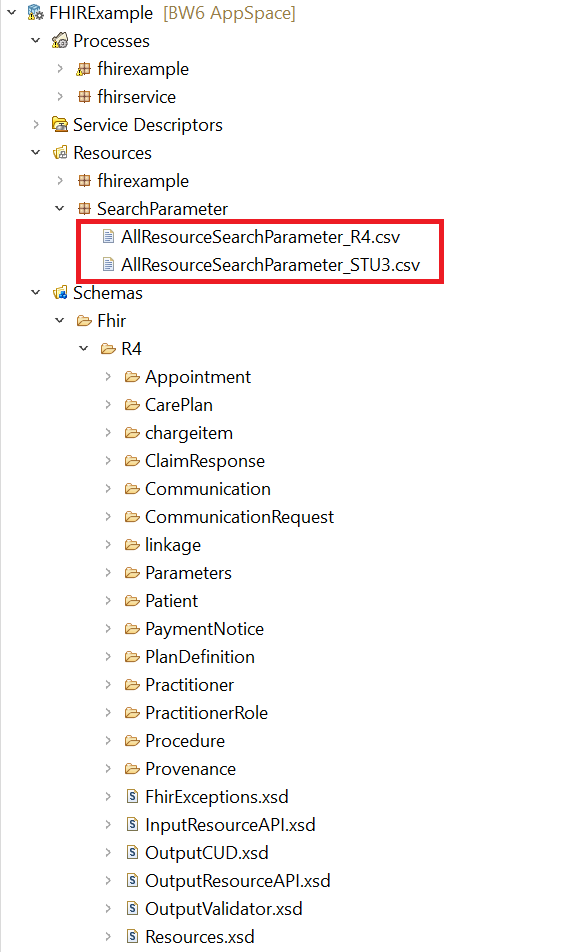
Add the AllResourceSearchParameter_{version}.csv file to the Resources folder under the SearchParameter package.
-
Find the generated schemas in Output/schema/{ServerVersion}/{ResourceName}. Copy the entire ResourceName folder to the specific server version folder under Schemas/Fhir/{ServerVersion} in the BusinessWorks application project.
-
Resources.xsd is generated in Output/schema/{ServerVersion}. Copy this file and replace the Resources.xsd file in Schemas/Fhir/ServerVersion.
-
To know about the folder and project structure, refer to the following image:

-
Refresh the project after copying the schema files to the project.