Installing a Connect On-Premise Agent with Proxy Servers or Firewalls
For many networks, security configurations include either proxy servers or firewalls. While TIBCO Cloud™ Integration - Connect is in the Cloud, your Connect on-premise agent is installed on a computer, as shown in the following diagram:
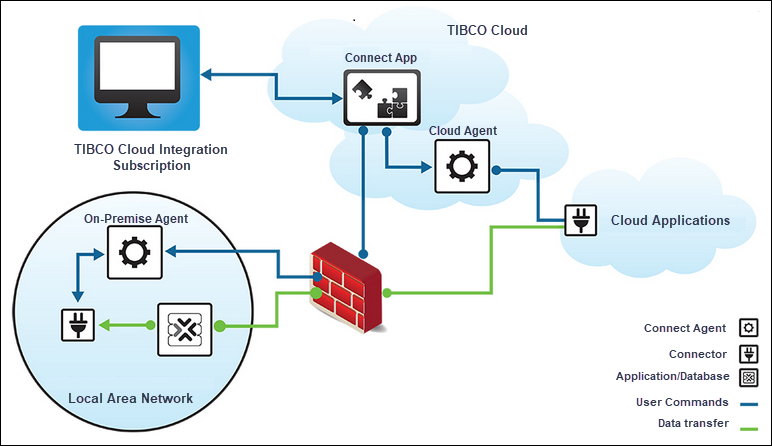
TIBCO Cloud™ Integration - Connect Architecture
If your site uses either proxy servers or firewalls, some additional steps are required to allow the Connect on-premise agent to access the cloud.
Symptoms that your Connect on-premise agent may be behind a network firewall or proxy are:
- You are unable to establish a connection to any one of these agent URLs:
- https://agent.scribesoft.com
- https://us-east.connect-agent.scribesoft.com
- https://us1-connect-agent-azure.scribesoft.com
- https://au1-connect-agent-aws.scribesoft.com
- https://agent-frankfurt.scribesoft.com
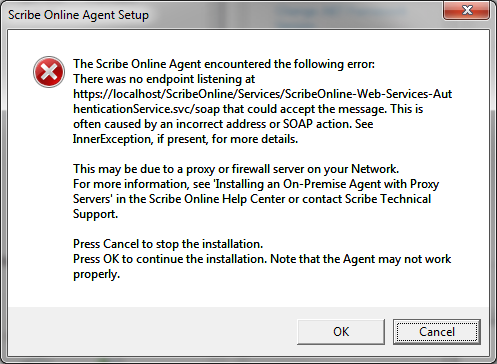
- When installing a Connect on-premise agent, you receive the following error:

- When running an app, the status displays Starting or In Progress for extended periods of time with no records being processed.
- You cannot create any Connections using your Connect on-premise agent or receive a message that No Connectors were found.
- The rolling log for the Connect on-premise agent, stored in ..\Scribe Software\TIBCO Scribe® Online Agent\logs, contains the following error message: (407) Proxy Authentication Required.
Configuring Connect On-Premise Agent Firewall Support
Some TIBCO Cloud™ Integration - Connect end users have Firewall servers to add an extra level of security to their environments. In this case, you may need to add exceptions or whitelist entries to the firewall for TIBCO Cloud™ Integration - Connect and other databases, such as Microsoft Dynamics CRM Online and Salesforce, to function properly.
Connecting To TIBCO Cloud™ Integration - Connect
If you are trying to connect to TIBCO Cloud™ Integration - Connect from behind extra security, add exceptions to the firewall for TIBCO Cloud™ Integration - Connect for your data center.
| TIBCO Cloud™ Region |
Data Center Provider |
Endpoints |
Static IP Addresses |
|---|---|---|---|
|
AWS Australia (Sydney) |
AWS Asia Pacific (Sydney) ap-southeast-2 |
https://au1-connect-agent-aws.scribesoft.com |
13.210.38.217 52.64.131.8 54.79.197.91 54.153.138.211 54.206.181.49 54.253.98.44 |
|
AWS Europe (Ireland) |
AWS Europe (Frankfurt) eu-central-1 |
https://agent-frankfurt.scribesoft.com |
3.94.183.228 3.210.164.229 3.210.220.205 3.219.0.211 3.219.82.130 3.222.1.182 3.224.17.183 18.204.188.169 18.211.255.76 34.192.161.112 34.199.140.171 34.230.155.160 35.158.9.191 35.174.159.215 52.1.131.218 52.2.155.242 52.3.62.147 52.7.200.1 52.20.44.177 52.23.130.182 52.28.61.234 52.29.220.8 52.45.5.15 52.58.102.181 52.58.248.24 52.70.64.150 52.73.34.66 52.73.83.188 52.203.27.122 52.205.243.69 54.82.228.30 54.86.177.217 54.93.152.15 |
|
AWS US East (N. Virginia) |
AWS US East (N. Virginia) us-east-1 |
https://us-east.connect-agent.scribesoft.com |
34.194.97.106 34.196.184.112 34.225.166.152 35.170.223.145 54.173.29.240 54.235.154.48 |
|
AWS US West (Oregon) |
AWS US East (N. Virginia) us-east-1 |
https://agent.scribesoft.com |
18.205.138.48 34.197.135.234 34.197.203.69 34.199.76.224 34.233.74.136 34.237.69.78 34.238.209.108 54.83.87.1 54.84.110.228 54.86.129.180 54.88.106.171 |
|
AWS US West (Oregon) |
AWS US East (N. Virginia) us-east-1 Sandbox |
https://sb-agent.scribesoft.com |
3.213.67.3 3.229.207.198 34.198.237.167 34.224.153.250 52.204.244.28 54.146.195.161 |
|
Azure US (Washington) |
Azure West US 2 (Washington) |
https://us1-connect-agent-azure.scribesoft.com |
13.77.173.116 |
For additional information on URLs and IP addresses that may need to be whitelisted, see Whitelisting Requirements For TIBCO Cloud™ Integration - Connect. For another useful reference on URLs and IP addresses and why they change, see Why do AWS Elastic Load Balancers have 3 IP addresses?
Configuring the Connect On-Premise Agent for Proxy Servers
Setting Up Ports and the Active Directory Account
- Make sure that all of the following TCP ports are open. If needed, talk to your IT Administrator:
- Port 443. This port is required for outbound Agent communication with TIBCO Cloud™ Integration - Connect. TIBCO Cloud™ Integration - Connect can respond to agent communication using port 443. If this port is not open, the Connect on-premise agent is not fully accessible from the TIBCO Cloud™ Integration - Connect website.
- Port 80. This port is required for outbound communication for SSL Certificate validation.
- Ports 5671 and 5672, and 9350 through 9354. These are outbound ports used by the agent to communicate with the Enterprise Service Bus (ESB). The ESB can respond to agent communication using the same port. If your network policies prohibit you from opening these outbound ports, contact TIBCO Support for assistance with an alternate configuration. Warning: Performance is slower when the Enterprise Service Bus (ESB) is not used.
The computer where you installed the Connect on-premise agent may experience very high CPU usage if:
- You have not configured your inbound and outbound ports correctly
- You have not added an exception to your firewall for TIBCO Cloud™ Integration - Connect
See the Check Ports In Agent Environment Knowledge Base article for instructions on determining if the agent can access the appropriate ports.
- Set up an Active Directory account with permissions to go through the proxy that uses these ports on the proxy server.
Editing the Scribe.Core.ProcessorService.exe.config File
To configure the Connect on-premise agent to use the Active Directory User account when communicating through the proxy, modify the Scribe.Core.ProcessorService.exe.config file on the computer where the agent is installed.
- Stop the agent Windows Service named Scribe Online Agent.
- Navigate to the agent folder. The default location is ..\Program Files [(x86)]\Scribe Software\TIBCO Scribe® Online Agent\.
- Use a text editor, such as Notepad, to open the Scribe.Core.ProcessorService.exe.config file.
Note: Run the text editor as Administrator or the changes to the file may not be saved.
- In the Scribe.Core.ProcessorService.exe.config file, find the section that begins with <basicHttpBinding>, as follows:
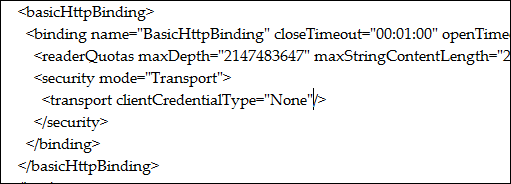
- Locate the following line:

- If you are using a Windows authentication based proxy server, add the following: proxyCredentialType="Windows" after "None"

-
The line should look like this:

- If you are using a nonauthentication-based proxy server add, the following: proxyCredentialType="None"

- The line should look like this:

- In the same file, find the appSettings section. Locate the following line:

- Add the following line to explicitly state that any calls made through the network by the Connect on-premise agent use TCP:

- The line should be placed as shown here.

- Save and close the Scribe.Core.ProcessorService.exe.config file.
- Restart the agent to pick up the changes you made to the Scribe.Core.ProcessorService.exe.config file. See Restarting A Connect On-Premise Agent.


Editing Connect On-Premise Agent Service Properties
After you modify the Scribe.Core.ProcessorService.exe.config file, you need to change the user account running the service.
- From the server where the agent is installed, open Windows Services.
- Right-click the Scribe Online Agent service and select Properties.
- Select the Log On tab of the Agent Properties dialog.
- Change the service to log on as the domain user for which your Network Administrator has granted permissions to have access through the proxy.
Note: As a test, log in to the computer as the domain user, and then try to sign in to TIBCO Cloud™ Integration - Connect. Make sure that your browser is not set up to use a proxy server. If you can access and sign in to one of the following URLS, then your user has the necessary permissions.
- https://agent.scribesoft.com
- https://us-east.connect-agent.scribesoft.com
- https://au1-connect-agent-aws.scribesoft.com
- https://agent-frankfurt.scribesoft.com
- https://us1-connect-agent-azure.scribesoft.com
- Save the changes that you made to the Scribe Online Agent Service properties.
- Restart the Agent Service.
- Test your changes by signing into TIBCO Cloud™ Integration - Connect and testing a Connection. If you can successfully test a Connection, then the agent is functioning properly through the proxy server.
In addition to changes for TIBCO Cloud™ Integration - Connect, you may need to update connectivity to your cloud application, as described below.
Connecting to Microsoft Dynamics CRM Online
Use the following information to connect to Microsoft Dynamics CRM Online from behind extra security.
Dynamics CRM Online Required Exceptions
To allow access to Microsoft Dynamics CRM Online, add exceptions to the firewall for the following sites:
- https://*.login.live.com
- https://*.crm.dynamics.com
- https://*.crm4.dynamics.com
- https://*.crm5.dynamics.com
- https://*.microsoft.com
- https://*.microsoftonline.com/
Dynamics CRM Online IP Addresses
For a list of valid IP address ranges, see the following Microsoft Support article: Microsoft Dynamics CRM Online IP Address Ranges.
Best practice is to whitelist all of the IP addresses in the IP address list so that you are less likely to experience a service disruption if Microsoft modifies the IP addresses.
Dynamics CRM Online Ports
Network ports for Microsoft Dynamics CRM
Connecting to Salesforce
Use the following information if your site connects to Salesforce from behind extra security.
Salesforce Required Exception
To allow access to Salesforce, add an exception to the firewall for the following site:
https://*.salesforce.com
Salesforce.com IP Addresses
Note that these servers are owned by Salesforce. The IP addresses may change and can be verified by Salesforce at any time.
- 204.14.232.0/23 - East Coast Data Center
- 204.14.237.0/24 - East Coast Data Center
- 96.43.144.0/22 - Midwest Data Centers
- 96.43.148.0/22 - Midwest Data Centers
- 204.14.234.0/23 - West Coast Data Center
- 204.14.238.0/23 - West Coast Data Center
- 182.50.76.0/22 - Japan Data Center
Salesforce.com Ports
- 80: This port only accepts HTTP connections.
- 443: This port only accepts HTTPS connections.
- 1024–66535 (inclusive): These ports accept HTTP or HTTPS connections.
Troubleshooting
Proxy and Firewall Server Logs
When the Connect on-premise agent attempts to make an external connection to the cloud, a site, or a database, and is denied by environmental security, the Proxy or Firewall server typically keeps a log of these attempts. These logs are useful for determining if a site that you wish to connect to is being blocked. TIBCO Support can help you determine which IP addresses to unblock based on your log files.
Agent Behind Firewall Stops
The URL the Connect on-premise agent uses to connect to the Cloud contains a trailing period (.), such as https://agent.scribesoft.com. Some firewalls do not permit the trailing period (.), which causes the agent to stop running.
Workaround:
- Navigate to the Connect on-premise agent folder. The default location is ..\Program Files [(x86)]\Scribe Software\TIBCO Scribe® Online Agent\.
- Use a text editor, such as Notepad, to open the Scribe.Core.ProcessorService.exe.config file.
Note: Run the text editor as Administrator or the changes to the file may not be saved.
- Locate
<add key="AdjustedURL" value="true" />and make sure that the value = true. This prevents your changes from being overwritten when you restart the agent. If this entry does not exist, add it to the add key section just before<add key="AgentApiUrl" value="https://agent.scribesoft.com." />. - Locate
<add key="AgentApiUrl" value="https://agent.scribesoft.com." />and remove the period after scribesoft.com. - Restart the Agent Windows Service.
High CPU Usage
The computer where you installed the Connect on-premise agent may experience very high CPU usage when:
- You have not configured your inbound and outbound ports correctly
- You have not added an exception to your firewall for TIBCO Cloud™ Integration - Connect
Whitelisting IP Addresses
You may find the following resources useful for information about whitelisting IP addresses:
- CIDR notation - https://en.wikipedia.org/wiki/Classless_Inter-Domain_Routing#CIDR_notation
- IPv4 subnetting reference - https://en.wikipedia.org/wiki/IPv4_subnetting_reference
Related Topics
Installing A TIBCO Cloud™ Integration - Connect On-Premise Agent
Troubleshooting The TIBCO Cloud™ Integration - Connect Agent
Whitelisting Requirements For TIBCO Cloud™ Integration - Connect