Query Block
To begin designing an Integration flow, your first step is to select the Query block for the Connection from which you want to retrieve source data. Drag the Query block from the Connections panel to the workspace.
A Query block or Native Query Block is required at the start of all Integration flows. The entity and filters specified in the Query block define what source data is processed by the flow, one record at a time.
If you have more than one stack of blocks on the workspace, only one stack can be processed by the flow. Use the Set Active Stack option on the Query block Gear menu for the stack you want processed to indicate that it is the Active Stack.

From the Query block you can:
- Select the entity in your source data that you want to process.
- Filter records based on a selected date field. See Block Properties — Net Change Tab.
- Add related entities. See Parent/Child Relationships, Hierarchical Data, Block Properties Include Tab — Relational Data, and Block Properties Include Tab — Hierarchical Entities.
- Specify filter criteria from the Filter tab. See Block Properties Filter Tab.
- View source data before you run your app from the Preview tab. See Block Properties Preview Tab.
- View errors for this block from the Errors and Warnings tab. See Block And Flow Errors And Warnings.
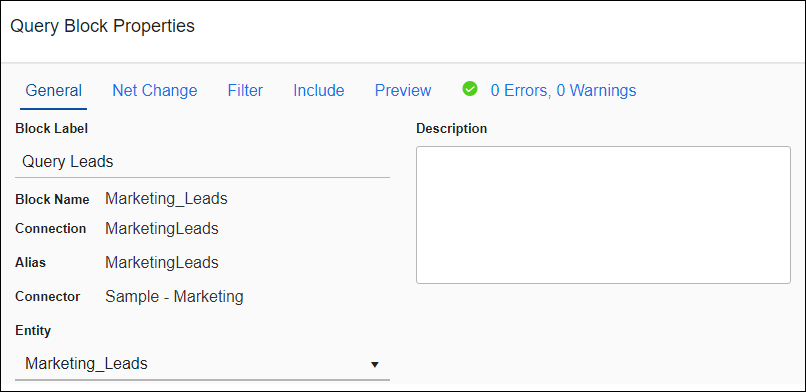
Block Properties — General Tab
After you have moved the Query Block to the workspace, you can begin to configure it using the Properties panel on the right.
Edit Query Properties
- Select the Query block to display settings in the Properties panel on the right.
- Select the General link to open the Properties dialog to the General tab.
- Optionally change the label and add a description as described in Block Properties General Tab.
Block Properties — General Tab
From the Block Properties General Tab, you can change the Block Label, add a description, and select the entity to be queried.
Block Properties — Net Change Tab
Use the options on the Net Change tab to either return all records or filter for new or updated records in your source data.
Process all or Process only new and updated records — If you wish to reduce the number of records processed by the flow, you can use the Process records settings to filter records by date. For more information on this filter, see Block Properties Net Change Tab.
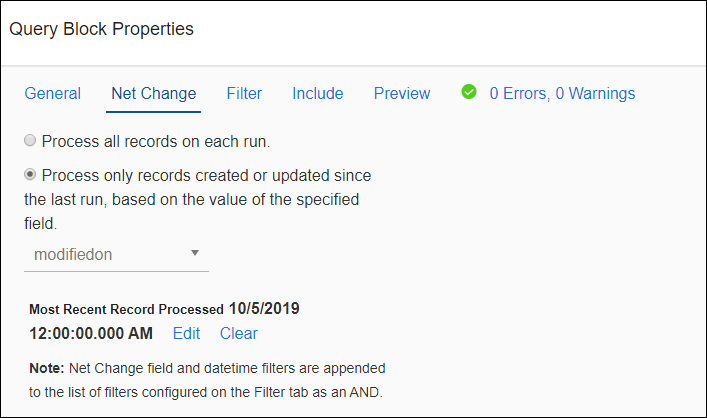
When a datetime is configured on the Query block on the Block Properties Net Change Tab to query for new and updated records, that configuration is treated as an additional filter. The Net Change datetime filter is applied as an AND after any other filters specified on the Block Properties Filter Tab. TIBCO Cloud™ Integration - Connect builds a query combining both the Net Change filter and the filters on the Filter tab. See Net Change And Filters for an example.
Some Connectors for TIBCO Cloud™ Integration - Connect only support one filter. For those Connectors you can use either Net Change or one filter on the Filter tab, not both.
Block Properties — Filter Tab
By default Query retrieves all data from the selected entity. Using the Filter tab, you can add one or more filtering criteria to limit the types and number of records processed by a flow. See Block Properties Filter Tab.
Block Properties — Include Tab
You may wish to process source data that is related to the selected entity. For example while processing accounts, you may want to retrieve all of the contacts for each account. In this case, you can select related entities on the Include tab to include the data from these entities in this flow. See Block Properties Include Tab — Relational Data and Block Properties Include Tab — Hierarchical Entities.
Block Properties — Preview Tab
Preview Source Data
Before building your flow, you can preview the first 25 records of your source data. When you open the Preview tab, TIBCO Cloud™ Integration - Connect generates, and then displays the first record in your source data to be processed when you run this flow. See Block Properties Preview Tab.
Block Properties — Errors And Warnings Tab
If there are any errors or warnings for this block, the Errors and Warnings tab displays the number of errors or warnings in the tab name. See Block And Flow Errors And Warnings.
Once you have corrected the errors, select the Validate button to update the Errors and Warnings tab.